Tuesday, December 29, 2015

Freezer Chicken Storage


So a couple months ago I had mentioned that I was going to try chicken storage similar to my meat storage.  You can read about the meat storage, here .  I've tried it for the last couple of months and so far it seems to work pretty well.  

This post includes affliate links, which means if you click on the link I get a portion of any sales at NO COST to you.  See my disclosure page for more details. 


3 things you will need: 
1. Chicken halves
2. Pyrex containers, the long ones, something like this

  3. Wax paper (Again you can use free wax paper from cereal boxes, Wax Paper ) 


You can decide how big of a rectangular or square container you want. 

What to do: 

After I did this one time I had a few things to work out.  First, make sure that you wrap each chicken slice entirely, any part that isn't wrapped will freeze to the glass container.  Believe me, not a fun thing to try to get apart.  


My tip would be to line the glass pan with wax paper and then wrap the chicken invidiually after that.


 Place the wrapped chicken halves in the wax paper lined glass dish.  Then, I cut off the extra wax paper around the edge.  I don't cut the paper to fit the glass,because I want the sides covered too.  Remember, any glass exposed will freeze to the chicken. 


 I get as many halves as I can in one container.  With them each being wrapped individually then I can grab one or two as I need them. 


The pyrex container I use is a 2.2 quart.  I can get 6 chicken halves in it.  I use Harvestland chicken, they are thinner than other chicken halves.  The 1st time I did this I was able to get 4 chicken halves in, so it really depends on how thick your chicken halves are. 


Tuesday, December 8, 2015

Painted Bottles

I'm always trying to tie savings with recycling and re-using.  I mean what better way to save money than by re-using something in a new different way.  My husband really likes root beer, now we don't buy it a lot, honestly, now we only get it when we visit my parents and my dad buys itbuy it, but then we have empty bottles that need to be recycled, or better yet re-used!

I can honestly say that the 2 orange bottles I have here, I have had since our 1st year of marriage, that's 6 years!  For our first year's tax refund we splurged and bought a bedding set for our room.  We finally had matching bedding, I was so thrilled!  With that new bedding, I wanted to spruce up our decor in our room, but I didn't want to spend a lot.  Well, I ended up spending nothing!

I had these root beer bottles sitting waiting to go to the recycling, so I decided to paint them to match the colors in our new bedding.  Then I went outside and found some sticks to place in the bottles.  Later, I found an article on Martha Stewart about paper flowers, so I went through my scrapbooking supplies and found the colors I wanted and made some fake flowers.

 Check out how to make these flowers from Martha Stewart.  They are easy and simple to make.  


So want to make some decor for your house, find some old bottles and get painting.  Acrylic paint works great!  Any glass bottle will work as well. For another idea of how to use the bottles for decor check out My Passion post. 


Monday, November 30, 2015

Presents, presents & gift bags!

Christmas...Birthdays...Showers...Weddings...New babies.  There are so many events that call for you to give a gift.  But, you're trying to save money and while you were so excited to get that really special gift on sale, now you are stuck having to spend money on tissue paper and a bag.  Items that before didn't seem so bad, but that $1.99 bag and $3.99 tissue paper adds up quickly! So what can you do, how do you still save money, but still be able to give a gift?  Easy!  First of all, I'm not sure who it came from originally, but I learned about it from my Mother In Love.  More than likely, it is in the Tightwad Gazette, because again, that's my Mother-in-Love savings go to.  

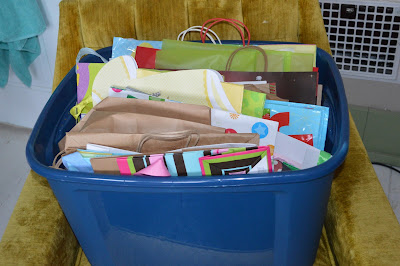
My Mother-In-Love taught me this trick right away.  Whenever you receive a gift from someone in a gift bag, save the bag and re-fold up the tissue paper and save as well.  Do this for every event that you get tissue paper and bags from.  Your wedding, wedding shower, baby shower, birthday, Christmas and so on.  It doesn't take long to add up, and you will be thankful for your free stash of tissue paper and bags for all occasions.  Like I said, my Mother-In-Love, taught me right away, and she helped me save all our bags and tissue paper from our wedding gifts.  Since then we have saved from birthdays, Christmas, my daughter's baby shower, her 1st birthday paper, and many other smaller occasions.  

As you have seen I'm sure, things come in groups, after our wedding we went to half a dozen other weddings within the next 2 years ourselves.  Boy did those wedding bags come in handy to re-use!  And by the way we still have some bags left for weddings :)  Then shortly after we had our daughter, we had dozens or more other baby showers to go to as well...again, thankful for those baby shower bags I already had (especially the neutral ones).  Now, there will be times you don't have a bag that works and need to buy one, but in all honesty my husband and I have been married for 5 years this past year, and have attended  at least 6 weddings, 12-15 baby showers, and who knows how many birthdays, and I have bought 2 bags, mainly because I wanted to follow a theme for them.


Now I mostly talked about gift bags but the tissue paper comes with it, and it's super easy to store as well.  To make sure that I don't go over board and run out of room for my stash of bags and tissue paper, I have come up with a system.  I only allow my self one tote for bags and one tote for tissue paper.  One tote for bags, fits a lot!  For the tissue paper tote, I divide my tissue paper up into colors (the art teacher in me), in shoe boxes.  I have one shoe box for warm; red, orange & yellows, one shoe box for cools; green, blue & purple, and then a larger box for white and fun style tissue paper.  All those boxes are in one tote along with bubble wrap and other packing items, in case I need to wrap a gift up to be more safe.  


You can get packing items and  bubble wrap for free as well.  Order any thing online, you usually get your item shipped in a box (that you can save as well if you have room), with bubble wrap or plastic that is a filler.  I save these as well.  I don't save them as much because I don't use them as often and again I don't want to overload my tote.  One thing about saving things is you need to do what works for you.  I have room to save my bags in a tote and tissue paper/bubble wrap/filler in another tote and still not feell like I'm cluttering up my house.  

So there you go a way to save on all those events that you are already trying to save on!  I hope that it helps you, and I apologize for how long this post was.  

Tuesday, November 17, 2015

Winterfest

I just wanted to share about our town event coming up in December.  My town holds an event called Winterfest in December every year.  There are all sorts of fun things, from a Gingerbread House contest, to a chili cook-off.  Finally, there's the Vendor fair.  This year's Winterfest is Saturday, December 5th.  I am planning on being there with my photos and I will be having a couple of Winterfest only deals, including custom made frame sets!! 


Framed sets starting at $25.00 

Choose a word or date to have printed and framed for you.  

5 frames or less $25.00
6-7 frames $30.00
8-9 frames $35.00
10 frames $40.00

Also 4x6 prints will be available for $3.00 a piece.


Or you can custom order prints

4x6 $5.00
5x7 $10.00
8x10 $15.00 

My friend will also be selling her awesome chalkboards! 

Here are a couple examples of some she has made. 


With each purchase your name will be entered into a drawing to win a Christmas chalkboard and this framed art set.  Value of $40.00!!!


So come and check out "Small Town Pics" & "Chalk It Up"

Tuesday, November 10, 2015

Wall Art that's cheap!

Ok, last week I mentioned this art project that we did for Christmas Creations.  Here is the how to:  

I wish I could take credit for this because it is so creative!!  It's such a great way to make an art decor for your home, and it's super cheap because believe it or not it's made from toilet paper rolls.  


Yep you read right, toilet paper rolls.  You could also use paper towel rolls. 


  I have to thank my friend Lisa Wiersma for giving me this idea.  I absolutely love this and I look forward to making some more for our house! 


Not only is it cheap, but again it's simple to make.  


1. Gather toilet paper/paper towel rolls & other supplies


2. Smush together to flatten the roll


3. Decide how thick you want to cut them and cut as many pieces as you will need.  


4. Glue pieces together.

5. Put a clothespin on the pieces you glued together until they are dried. 

6. Come up with whatever design you want! 


You can also add extra layers like my sister did. 


Wednesday, November 4, 2015

Christmas Creations part 2

Remember my Christmas Creations post?  If you missed it, you can find it here.

This past weekend my family had our annual Christmas Creations. This was our 4th year, and, my, how things have changed.  Over the past few years there have been a few pretty significant and adorable additions made to the family, i.e., my  children. While in the past we were able to sit down and create craft after craft & enjoy some good conversation while sipping our coffee, this year we did crafts in shifts. We would start a craft and then 2 diapers, 1 nursing session, and a nap later (unfortunately not for me) we'd continue the craft. Here's a peak inside our crafting, hopefully you'll find some inspiration! 


This is what I LOVE about our Christmas Creations tradition.  There is no formality to it.  We set a date, a come and go atmosphere and we have 2-3 crafts that are available to do.  Instead of it being a day where, in the middle of the holiday rush people are focusing with the 'we need to get this done,' attitude, it's a day of family, friends and fellowship.  This day isn't about the finished product, but rather about the time spent making it, and learning how to make it to then make again for your friends or family.


Coffee is a must at our Christmas Creations!

 I just love the mess, it truly shows the creativity! 


The follwing are the 3 projects that we created this year


1. Wall Art 
Stay tuned for next week's post on the how to for this creation! 


2. Stamped books 


3. Homemade lotion 
I also have a recipe for this creation posted on my 1st Christmas Creations post


My sister showing off her beautiful wall art.  She got extra creative with hers and added different layers. 


As I said before, the best part is just sitting together and enjoying our coffee, conversation and crafting. Comment below on your favorite holiday craft!


Monday, October 26, 2015

More water savings

Another water saving tip.  I was thinking about this one day while washing dishes, just like you can save water and money by turning off the tap when shampooing and conditioning, you can save while washing dishes too.  I've always tried not to run the tap while washing dishes, just because when I'm not rinsing a dish it seemed wasteful, but now I really try to watch how much water I use.  So here is my washing dishes tip: 

I first plug the sink, and put in some soap, then I do let the water run for a little bit to fill up the sink about 1/4 of the way; however, while it's running I wash my silverware, so I'm at least using the running water as well as filling up my sink.  Plus I once read something from Martha Stewert, that you should always wash your silverware first.  Anyways, after my sink is 1/4 full I turn off the tap.  Then I add a few dishes at a time to the sink and wash them all in the sink.  Once I've washed them then I turn on the tap just a little and rinse the dishes off.  I wash a little and rinse together to make sure they're clean.  Then after the ones in the sink are done, I turn off the tap and put some more dishes in the sink and repeat.  

So instead of filling up the sink all the way, and having the water just run when I don't need it to, I only turn it on when needed and I turn it on low, but high enough to rinse.

Now I will say, I try to wash as I go during the day, rather than have a ton to do all at once.  Plus, I can't say I wash my dishes this way all the time.  I'm human and there are many times I end up just letting the water run becuase it's faster.  Or my 2 year old wants to help & well, we end up using more water, but that's quality time so it's worth it.    

One last thing, if I have any recycle items that need rinsed out, I save those for last and use the water that's left in the sink.  They're going to get cleaned and melted anyways so no use in using new water from the facuet for them. 


I also know of a couple who's sink is pretty large and so they just put a smaller plastic bucket inside the sink and use that to wash their dishes in.  That way they don't have to fill the sink with more water than needed. 


How do you save water by washing your dishes, please share I'd love to know.  Remember it may not seem like a lot, but every little bit of savings adds up. 

Tuesday, October 20, 2015

Turn off the Tap


So one day, I was reading the back of my shampoo bottle, because I read anything that's around me and so what else am I going to read while shampooing my hair.   Anyways, according to Suave, the average family can save 100 dollars, and 3,200 gallons of water a year if you turn off the tap while shampooing and conditioning.  

I mean WHAT? 

I honestly never thought about how much water and money LITERALLY goes down the drain when you are shampooing and conditioning.  So I decided I was going to try it.  Can't say that I will be able to keep it up in the winter time, too cold for me to turn the water off, but I can at least start.  

So next time you're shampooing or conditioning, try and see if you can turn off the tap to save some money and even water!  

What are some ways you save on water? Please share! 

Wednesday, October 7, 2015

Laundry Detergent: Step by Step


Because of some interest here is a step by step guide to making your own laundry detergent.  I also included my calculations for what the initial cost should be and the cost for each item: 


Fels Naptha $0.97  
Borox 76oz  $3.97
Arm & Hammer Washing Soda 55oz $3.97

Total Initial Cost: $8.91 + tax 


First: Grate the bar of soap: 


This seriously took me like 20min, and I watched my favorite Gilmore Girls show as I grated it too. Now if you don't have a lot time, just grate 1/2 the bar and then 1/2 the rest of the recipe.  Side note, it makes your hands & the room you're sitting in smell Amazing! 


2nd: Add 2 Cups of Borax 


3rd: Add 2 Cups of Washing Soda 

Now I forgot I needed 2 cups, so had already added the 1st cup, that's why only 1 cup is filled. 


Mix all the ingrediants together 


Store in container.  I store mine in a glass Anchor jar from Target.  


2 Tbsp for each load.


My uncle has got his down to 0.06 cents a load! 

Pinterest