Saturday, April 30, 2016

Play Money

After we made the grocery store in our house, my daughter has gotten into paying for her groceries too.  Missed the in-home grocery store idea, check it out here.

So just a few weeks ago my daughter asked me for some play money.  Right now she plays with my old giftcards for her "credit cards", but she wanted some cash too for her and her friend that we had over.  So I grabbed a pencil, some paper and my scissors.  Within minutes I had made some play cash for them.  We even took it one step further and I grabbed a couple reciepts, (cash ones), and as they bought groceries they could pay for them and then get a reciept back.

Now I have to say that the ones I made them really did take a couple minutes and weren't as nice.  I later made these ones for future use.

Here's what you'll need: 

Paper (I used 8.5 x 11)
scissors or paper cutter
pencil
milk gallon lid

The Process:

1. Cut paper.  I cut my play bills 4" x 2".  This allowed me to get 10 bills/page.

2. Use a milk gallon lid to trace the middle circle.


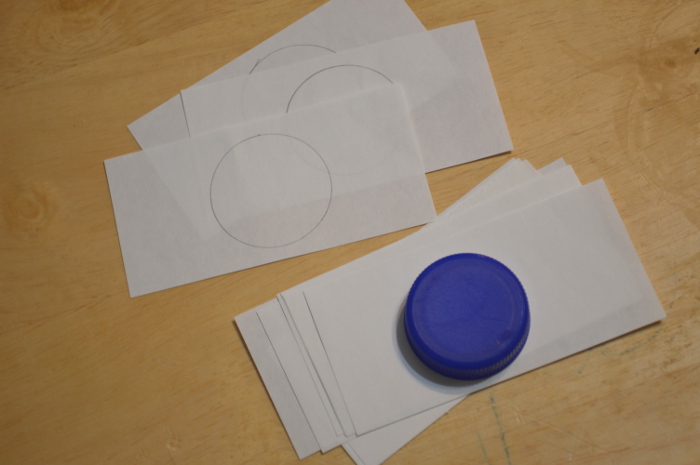
3. Add the monetary value of your choice. (I chose $1.00, hoping to teach adding as I go).


4. Laminate (This is optional)**

**One way you can make it last a little longer would be to laminate them.  I have 2 ways that I laminate.**

1st: Cold Laminator
A woman who is close as family let me have hers that she wasn't using.  The replacement paper isn't that much and it really comes in handy for different home projects.  If you can invest it's worth it.

2nd: Packaging Tape 
Before I owned a cold laminator, I wanted to laminate different newspaper clippings (my husband was in the paper a lot), but didn't have access nor the funds to laminate.  I read somewhere about using packaging tape. It works really well, you just have to be careful and go slow.  Tape one side and then flip over and repeat.


Now for me, my daughter is still a toddler and so we lose a lot of toys and/or they are easily ruined.  With that, I didn't want to use supplies that cost more; however, you could easily use cardstock to make the paper a little heartier if you have older kiddos.

Or if you work at a daycare or school this is a great way to add some learning without breaking the bank.  I'm a former teacher so I completely understand spending your own money on supplies.  What I love about this is that 1 got 10 play bills out of one 8.5x11 paper.  


What are some ways you teach counting, or real life skills to your kiddos?


This post includes affiliate links, which means if you click on the link I get a portion of any sales at NO COST to you.  See my disclosure page for more details. 

Thursday, April 28, 2016

Deep Freezer Inventory

Buying things when they are on sale and stocking up is one of the biggest ways I save money on groceries.  

With that, the deep freezer we bought a couple years ago has been great at storing the food we buy on sale. Things like bread, cheese and meat.  The hardest part though is remembering what we have in the freezer and over buying on one thing and then not having enough room for something else that we need.

So I decided to make a freezer inventory.  This way I can easily see what we are low on and whether or not we need to stock up on a particular item or not.  I made a simple inventory on a Word document.  Feel free to download and edit the attached document.  

It takes a little bit of time in the beginning to log everything, but once it's done it saves so much time and money (i.e. not over buying).  One word of advice, I waited until we emptied most of our freezer so I didn't have that much to sort through.


  I got a simple magnet holder and it holds my inventory list and a pencil right on the deep freezer.  That way as I take something out, all I have to do is cross off what I took out.  It works great! 

Another option would be to tape the inventory to the top of the freezer and add a pencil taped to string.  No need to spend any money, and it makes it more hands free if you are balancing a little on your hip. 

Freezer Inventory


Now, I just need to make one of these babies for my fridge freezer and pantry. 


This post includes affiliate links, which means if you click on the link I get a portion of any sales at NO COST to you.  See my disclosure page for more details. 

Monday, April 25, 2016

Library

A couple weeks back our town library had their annual book sale, which they host during National Library week every year. This is such a great way to buy books without spending much. I was able to get all of the books below for only $2.20!!  


Most libraries host a book sale at least once a year. It's a great way for them to rotate out books, and for people to buy books for fairly cheap.  

Now, they aren't the newest books, they're typically the ones that have been in the library for some time. But, the library has the new books as well for you to check out. And guess what, you can check out the books for free!  

The Library has 100's of free books! Which is something I think a lot of us take for granted. Seriously, next time you see a book you really want, check to see if your local library has it first. It will save you money and trying to find a spot for that new book in your home. Plus if they don't have the book, libraries have this awesome thing called inter-library loan. They can check the book out for you through another library (depending on where you live there may be a postage fee for this).  

Libraries also have movies, TV Shows & some even have games, that again you can check out for free!

Not to mention libraries are always having some program or activity going on, that again, you guessed it, is free! Talk about some great family fun for and I can't stress this enough, free! 

So next time you're wanting a new book, TV show, movie or even game check out your library first. They may be able to save you that $20-$40 you were going to spend.   

Saturday, April 23, 2016

Garden

Growing up, my parents had (& still do have) a HUGE garden, especially for the city.  With this garden we had canned green beans, pickels, salsa, spaghetti sauce, tomato juice and potatoes that lasted us for almost the whole year! Not to mention, cucumbers, peppers, tomatoes and onions to eat almost all year long.  

Now, my dad's garden isn't your typical size, unless you own a farm, or you're lucky and have that kind of land like my parents'; however, any size of garden is a great money saver. Growing your own food and canning it is not only better for you, its cheaper too!


If it's your first time gardening, don't start out too big. Start out with something you really like and then each year add a little. It takes time to figure out what you want and how you want to grow your garden and that's ok. Just remember every little bit is a little bit that you are saving. 

I've tried a few new things each year, but after last year I decided I really only need 4 veggies; tomatos, onions, cucumbers and green beans.  I want to have canned green beans, pickels, salsa and spaghetti sauce. Other than that, I don't really need anything else. So even though my garden isn't very big, really a puddle compared to my parent's lake, I can still get a lot of canned goods, by just planting multiple plants of what I want.  I'm looking forward to putting this plan into action this Spring and Summer!  

Don't have room for a garden? Find some friends who garden and ask if you can have a spot for some plants, or buy some of their harvest.


Another great thing to can, applesauce.  All you have to do is find someone who has an apple tree.  People who have apple trees are usually more than willing to share their apples, whether for free or a small fee.  Either way, you can make your own applesauce a little cheaper.  You can find the recipe on my post about baby food, here. 

Do you garden?  What are your favorite things to grow?  


Thursday, April 21, 2016

Party supplies

It's that time of year again, the time for birthdays.  We have multiple birthdays that are clustered together.  I love when I can go down to my basement and grab some plates, napkins, cups and decor instead of having to go out and buy everything.

This is something that my mother-in-love has in her attic and I was so inspired by it. One thing I hate throwing away or wasting is all the fun leftover paper plates and napkins from parties. My mother-in-love has planned all kinds of parties, from birthdays to baby and wedding showers. She got organized and saved the leftover party supplies, color coding them in clear containers.


This is genius. Now whenever I have leftover paper plates and party supplies, I add them to their designated color storage tote. This way I have some for the next year's party, whether its birthday, or throwing a shower for someone. Along with having the decor, plates, napkins and more, you can also have gift bags and tissue paper ready as well, check out my other post here, about the how-to.

Another great idea, stock up on seasonal items right after the holiday, all the extra supplies for Thanksgiving, Christmas, Easter etc.  Decor, plates, napkins and more can go as low as 75% off after the holiday is over.  Then you can just add them to their designated tote and have them for the next year without spending the full price!

The hardest part about this is finding a spot for all the totes, so do what works best for you.  We have a cold room that we can use for storage, and that's where I keep all my totes.  I limit it to 1 tote per color, reds and pinks together.


This post includes affiliate links, which means if you click on the link I get a portion of any sales at NO COST to you.  See my disclosure page for more details. 


Saturday, April 16, 2016

Snack Mix

A friend of mine makes her own snack mix and I thought that was such a great idea to do.  So I started making my own as well.  Over the years it has changed, especially since my little one has been eating it too.  What I love about making my own is I can change it up so I don't get bored and I get to choose what I put in it.  Plus I can stock up on the ingrediants when they go on sale and it can be more afordable than buying snack mix.    


Here's what you need: 

1 large box of Goldfish 
1 box of Cheerios
1 box of Chex Cereal 
1 container of Peanuts ( I usually do a couple different types, for this recipe I used almonds & peanuts) 
1 bag of Pretzels
8 boxes or 1 large ag of rasins
Measuring cups

Large bowl (the one I use holds about 4 quart or 16 cups) 
4 gallon sized freezer bags


I recently just threw in the rasins and I really like them.  For a cheaper recipe you can swap sunflower seeds for the peanuts.  Then the rest you can differ as you please.  

Some other options to use: 

Cheese Its (I originally used these until the little was born, then I switched to goldfish).  
Animal Crackers
Popcorn 
Honeynut Cheerios
Multi-Grain Cheerios 
Honey Chex or any of the other many flavors. 


Again you can make it how ever you like!  Not a fan of cereal, leave it out.  There are so many options! 


Here's my step-by-step: 

1. I separate the nuts and/or sunflower seeds into 4 bowls.  It just makes it easier to divide later. 


2. Scoop cereal into a large bowl.  I do about 2-2 1/2 cups of each cereal. 


The bowl I use can hold up to 4 quarts or 16 cups and I usually fill it almost entirely. 


3. Add pretzels.  I just add a few handfuls.
4. Add nuts 


5. Add goldfish.  With this being the last thing I add, I just add until the bowl is pretty full. 6. Mix together.  Little helpers are always helpful! 


7.  Scoop into a gallon sized freezer bag.  


My 1st bag always has the least amount so as I go, I add more to it.  The best part about this mix is it doesn't have to be exact, just mixed up enough for variety. 


Now, I do wait until the different items are on sale and then buy them in bulk to make a large amount of the snack mix.  The recipe above will make about 4 gallon sized bags and I freeze what I won't eat right away.  The best part about this mix is it's healthier than most snacks and so it's great for your kiddos to snack on.  Plus its better than just eating Cheeze-Its until the box is empty, yep I have done that. 


Thursday, April 14, 2016

3 Ways to reuse that ice cream bucket

I love ice cream buckets! Even after the ice cream is all gone from them. They are functional for so many things. Here are a few of my favorite ways to reuse ice cream buckets.

1.Storage
Shoes, craft supplies, cleaning supplies, toys, etc. Check out my other post about toy organization using ice cream buckets, here.

Kid shoes are small, and so they don't take up a lot of space. I was able to get size 2, 3, 4, & 6 in their own bucket. Size 5 was during the winter months and the boots didn't fit as well. But this beat buying storage conatiners for all these shoes. Plus then I can keep the sizes separate which will come in handy.


2.Sand bucket
Why spend money on a bucket that's only purpose is to be filled up and dumped out? The ice cream bucket works well and even has a handle. 


3.Collecting
My daughter loves to collect things as we walk; leaves, rocks, sticks, pretty much anything that she can pick up off the ground.


How are ways you reuse containers in your house?  

Thursday, April 7, 2016

Playing Mommy

My Baby Girl loves to model what I do.

 Just this last month she has really gotten into buying groceries like Mommy.  She loves to go to the grocery store with me.  Of course at Hy-Vee she gets to push her own cart and at Fareway she gets to drive in one, so that just makes it even better, but she loves to help me shop.  Recently, she wanted to do grocery shopping at home.  She was so cute, and I'm sure I'm biased, but she said "Mommy, go shopping?"  And I of course said "well we don't need to right now, but we can this weekend."  She grabbed her cart and said "No, Mommy go shopping, at home" with a little smile.  Then I realized she wanted to play shop.  So I said, "Ok let's go".  Now here comes my favorite part "Mommy where is the grocery store?"  It was so cute!  She wanted to play shop, but we haven't done that yet and so we haven't created a play store in our house, she didn't know where to do her play shopping.


So we got right to it.  Now we don't have a lot of play food, and when I started to make a play grocery store, I realized how little we have for play food and play food containers.  But, then I thought, I'm sure I could make something.  Here are some of the things we used:


Crocthed fruit (my sister makes these check her out here)


An empty graham cracker box
An empty Triscit cracker box
An empty cereal box
(All of these were added as we used them)
Her container of maccaroni noodles


We just used some empty baskets that I had around the house as produce and dessert holders.

Really we just used what we had on hand.  There was no money spent.  This entertained her for at least 30min, and if you have a toddler you know that's a long time for them.

We set up her grocery store on some shelves in our dining room.  She used a little felt bag that she could walk by and collect her grocery items in. (Another way of modeling me as I try to use reuseable bags whenever I can).  For the bigger items she would use her grocery cart too.  Can't say thanks enough for this item from her aunt and uncle, we've had it for 2 years and she still loves it!

Some other things to add: 

Old gift cards to pretend pay.
Paper money to practice adding or the act of purchasing.  You can check out my how to on making your own paper money here
Real food like fruits that they can then eat as a snack.


Pinterest