Showing posts with label Storage. Show all posts

Thursday, March 30, 2023

Spring/Summer Clothes


    It's almost April 1st, and in our household that is about the time we start looking at our Spring and Summer clothes.  In the last couple of years I started having a note in my phone on April 1st as a reminder to start taking inventory of what we have for the Spring and Summer as well as make a list of the items we will need.  It's so easy to go and shop for a bunch of new items that we might only need a handful of.  On the flip side, it's also easy to assume I have what we need in our totes from previous years; that's what I kept doing and unfortunately it didn't end well.  At the time, my 2nd grader was starting to care more about what she was wearing; and not having what was needed or have items to match her sisters if she wanted to, caused some problems.  With that, I made sure to have time to go through our clothes before it got too warm.  For our area that's about April.  We always have one or two shorts on hand from the previous year that still fit just enough for if we need them in a crunch in March, but by April we'd need more.

With that, here's my tips for switching over the next season.  

First: Go through those storage totes 

Like I said, it's easy to just run out to a local store and buy what you'd want for the next season, but going through what you have is so helpful.  Don't have storage from the year before, make sure you check out my post on how I save from kid to kid so that you can start doing so after the Summer. You can check that out here: Clothing Switch

Second: Make a list 

So back to going through what you have.  After my girls have sorted through what we have and what fits I make a list. I list how many shorts, shirts, jackets, shoes; anything else my girls would need that still fit.  I like to use my phone notes for that, I just make a list for each kiddo.  

Third: What will we need 

This can change each year.  For example, one of my girls is just starting to like wearing jean shorts.  So we may talk about how many jean shorts she'd like vs. athletic shorts.  This also will depend on what she's active in for the summer.  Another one of my girls prefers capris, while my 3rd prefers dresses. So what they need may vary.  But, I like to make a estimated list of what we need so I know when we go shopping.  

And that's it!  It really does help to know what you already have and what you'd like to get, before you enter the store.  There are so many times before that I would blank on what they had, or get items I thought we needed and really we didn't. I hope this helps you as you might be transitioning to warmer weather in your area as well. 


Thursday, January 19, 2023

Ice Cream bucket = free storage


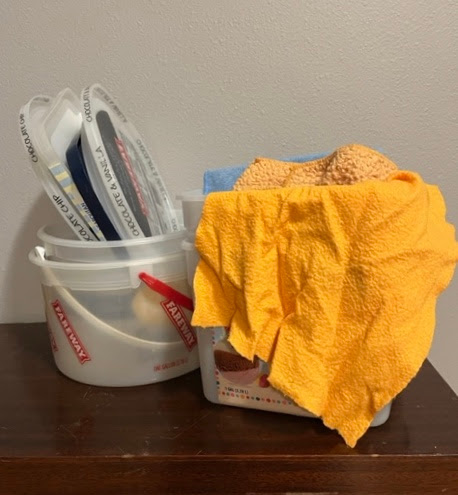
Way back when I first started my blog, I did a post or two on re-using ice cream buckets as storage. You can check them out here: Ice Cream bucket storage or 3 ways to use that Ice Cream bucket but over the years I've added a few new ways to re-use that ice cream bucket and wanted to share. 

1. Freezer storage: 

This is my new favorite! We have a deep freezer and if you have one you know how hard it is to lose something at the bottom. Well, if you use ice cream buckets to store your items in it helps getting those items from the bottom better.  Things I use my buckets for in the freezer: 

  • meat
  • homemade cookies/treats
  • gluten free items 
  • homemade mini pizzas

2. Storage in your shed: 

I recently have been trying to organize our shed better.  Here are some ways I organize with the buckets in my shed: 
  • gardening gloves (mine + my girls) 
  • seed packets 
  • soil pods
  • gardening tools + markers 
  • summer toys for girls 

3. Pots for your plants:

In the last couple of years, I've become a plant lady. Well, I always have enjoyed plants, but in the last few years I've added a lot of plants to my house.  It started with a couple as gifts from my grandpa-in-law's funeral.  My husband and I were gifted two beautiful plants to take home, since then I have added many more! Ice cream buckets make great pots for plants; especially if you don't want to spend a lot. 

4. Outside toy storage: 

We have a big toy box we keep summer toys in.  After awhile the toys were just getting dumped.  So I took some of our ice cream buckets to use: 
  • jump ropes 
  • chalk 
  • bubbles

5. Around the house: 

  • Use for plastic bags: both ziplock or grocery bags  
  • Kids' toys 
  • cat/dog toys 
  • homemade baby wipes 

Friday, September 30, 2022

Clothing Switch Over


It's officially Fall! Well, I know it was technically Fall last week, but now that it's officially October it seems more Fall.  Plus in my area that seems to be when the weather really starts to change to colder Fall temps.  Which means, the official switch from Summer to Fall clothes in our house.  The thing is, this isn't an exact date that happens every year.  It could be early October, late October, or sadly some years in September.  But, the point is it sneaks up on us.  Thankfully, this year it's been warmer a little longer.  Over the years, I've learned to stock up on the Fall items early on.  One way I've done this is by storing clothes the girls have grown out of.  

I'm blessed with three girls.  For many reasons they are a blessing, but when it comes to clothes it really does help that they are all girls.  I can save what the oldest has grown out of and keep for the next and then the next. Well, at least for now this method still works a bit.  As they have gotten older and care more about what they wear or how clothes feel we have less that is re-used. BUT, when that first cold day hits we aren't scrambling for clothes because we have some they can start with.

As I have done this for many years I have a system that works for me.  Hopefully, this will help you if you are just starting off, or for ideas if you needed. 

Each size and season have their own tote. When my girls were younger I could get all seasons of one size into one tote.  But, as we've added clothes and their clothes have gotten bigger we have switched to season totes for each size.  

One big thing for this is finding the space. I've done everything to having 1-2 totes in their closet, to the skinny long totes that can fit under their beds. Once you find the space you can store the totes then it's easier to get the totes for that space.  I do like to keep the current size/season in their room if possible.  That way as we switch back I can just put their clothes in that tote. Plus, if there's something that is a size 6, but through the season we realized it fits snug, I know to put it in the size 5 tote instead. 

Then using tape and a sharpie, I label the clothes in that tote.  


This post includes affiliate links, which means if you click on the link I get a portion of any sales at NO COST to you.  See my disclosure page for more details. 


Also, I have a tote for the future.  My oldest is definitely the ones who ends up with the least clothes and we need to buy more for.  So I have a tote that is for her future size.  As we find things on sale she might like we put them in that tote. That way she has something to browse through as well to start off with. 


Finally, I also have a tote for the girls' shoes.  Sometimes they can be reused, other times we end up pitching them.  But, we've gotten many years worth out of snow boots and other shoes so it helps here and there. 


I'm sharing some links to totes we have or are similar to what we have.  They are costly at first, but they do last forever.  Also, if you can first check out garage sales, or consignment stores, you usually can find them pretty cheap there.  Otherwise, check out these links for more options.  Like I said above we used the under the bed totes for a while, they worked awesome.  I actually still use them for the kids spare sheets.  


Tuesday, September 15, 2020

10 ways to re-purpose that tin can


 Recycling is huge!  I'm all about recycling anything we can; however, if I can re-purpose something instead I will.  First of all, not only is that one less thing being broken down to recycle, but it's also one less thing I'm purchasing.  Here are 10 ways that I've re-purposed tin cans in our household, of all sizes. 

Cat food cans: 

1.  Office/Junk drawer organization:


    Tuna cans are great for organizing those small things in your office or junk drawer.  We have 4 that we use to hold paper clips, rubber bands, our menu cards and other little odds and ends. 


2. Bathroom storage: 

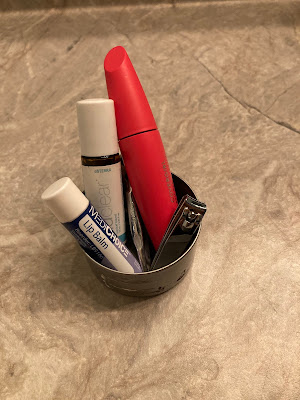
      Cat food cans do a great job holding those small things in the bathroom; your lip gloss, chapstick, tweezers.  I have one tuna can in my cabinet that holds all those in one.  It's great to hold those small items together so they don't get lost amongst all the other bathroom items.  


Tuna cans: 

3. Earring holder: 

    Tuna cans are the perfect size to hold a few pairs of earrings.  Plus then they don't get tangled together if you have any of those dangly ones.  They also aren't very tall so they fit in a drawer really easily. 


General tin cans: 

4.  Organizing craft supplies:   

    We use these for holding markers, colored pencils, crayons and more. They are a great size for kids to be able to grab easily.  Or you can put them in a little bin and have your bin more organized as well. 


5.  Make a craft with them:

    Tin can style is in.  Wrap some yarn or twine around them a few times or a lot.  Add some decor inside and it can make a great centerpiece.  


6.  Organizing bathroom essentials:   

    Another great way to organize the bathroom.  Works well for holding q-tips, cotton balls, hair ties etc.  They are also small and can fit together in a small space, but keep order to your bathroom cabinet. 


Large cans (baked beans) 

7. Garden tool storage: 

    The large tin cans are a great way to store those gardening tools.  The girls and I all have our own little tin can.  It has our own gloves, a little rake and 2 shovels.  Eventually, I plan to put labels on them so we each have one with our name on it. 


8. Kitchen utensils: 


    A great way to keep those utensils from falling all over in their storage container.  Take a large tin can and place it inside your utensil holder.  It's perfect to keep the utensils more together.  If you have an oval or larger container, you can divide your utensils up into a few different large tin cans.  


9. Pet organization: 

    Organizing all that pet stuff.  We keep our cats' collars, tags, brushes and their treats in a large tin can.  It's perfect to just grab when we need something.  


All can sizes

10. Planters: 

    Have you seen the fun ways people are using their tin cans as planters?  It can be for herbs, or small plants.  You can use any of the different sizes.  While I haven't tried this yet, it is on my list of things to try.  Check out a simple how to on the blog, Handmade Charlotte .  She does a great job of showing step by step photos.  Plus, if you want to hang them, she shows you how to do that too! 


Thursday, October 13, 2016

Gifts in a jar

I love Pinterest and all the ideas on different gifts you can do in a jar.  While mason jars aren't necessarily expensive, a way to save even more on these gifts is to re-use glass jars you have.  Remember my post on Organization in General, well this is a similar concept, only this time you are using the jars as gift holders.  I have made many jar gifts using old spaghetti, salsa, and even pickle jars.


Things you will need for all: 

jars of all sorts
spray paint or acrylic paints
paint brushes
paper (to decorate) 
tape

Here are some additional items for specific jars: 

Father's Day

Additional items:
computer
printer
cold laminator or packaging tape
Father's Day labels from Martha Stewart

Baby shower gift

Additional items: (optional) 
small animals 
hot glue sticks
hot glue gun

Bridal Shower

Additional items to go in jar: 
nail clippers 
mini hair spray
travel klennex pack 
needle and white thread 
lip gloss or chap stick 
travel deodorant 
a small note 
anything else you might need as a bride the day of the wedding. 

For each jar you start the same.


1. Wash the jar in warm soapy water.
2. Fill jar half way with vinegar and shake (this helps eliminate any smell from what the jar use to hold). 
3. Wash again to rinse out the vinegar & help remove any of the label that didn't remove the 1st time. 
4. Paint the lid the color of your choice. (If you are making one for a baby shower and want to attach a little animal, hot glue it to the lid first.  Then spray paint all together.)


I always start with white when hand painting, whether it's for primer or final color.  I also do about 2 coats in addition to the 1st coat of white.  Make sure you let the paint fully dry before you add another layer or it will peel off the 1st layer.  


5. Add the paper by taping it together in the back.
6. You can then add anything extra you want.  On these I just printed off the words on my computer and attached them with tape.  These jars are for my guests.  

Here are what they contain if you are interested: 

Brush: travel toothbrush & toothpaste.  
Relax: nail clippers, nail file and some hand cream. 
Wash: hotel bottle of shampoo, conditioner and lotion.  


This post includes affiliate links, which means if you click on the link I get a portion of any sales at NO COST to you.  See my disclosure page for more details. 


Thursday, July 7, 2016

Summer Toys

Oh Summer! Summer comes and so do all the outdoor toy options. However, if you're like our family you buy what works for you at the moment and then later need to upgrade due to more children. When our 1st turned 1 for her birthday my parents bought her a sandbox. It was absolutely perfect just for her and a friend. However, now that our oldest is an older sister and she has friends that come over, we plan to upgrade a couple sizes for next summer. We were going to purchase a 2nd pool so that the littles would have a kiddie pool and the older girls would have a pool that they can use the slide in without hurting the littles. Knowing that we plan to upgrade the sandbox, we decided to keep the old sandbox and convert it into a kiddie pool. This isn't going to happen until next year, but now we can save some money and instead of buying both a second pool and a larger sandbox, all we have to purchase is a larger sandbox. Yes, an additional pool is only $10.00, but why spend the $10.00 when we don't have to? 

This summer use what you have, just because it's made to be one thing, doesn't mean you can't convert it to be something else that works for your family. Get creative and show your kiddos that it's good to think outside the box. Reuse and Repurpose this Summer!


Monday, June 6, 2016

Preschool-Stay Home Learning Part 2

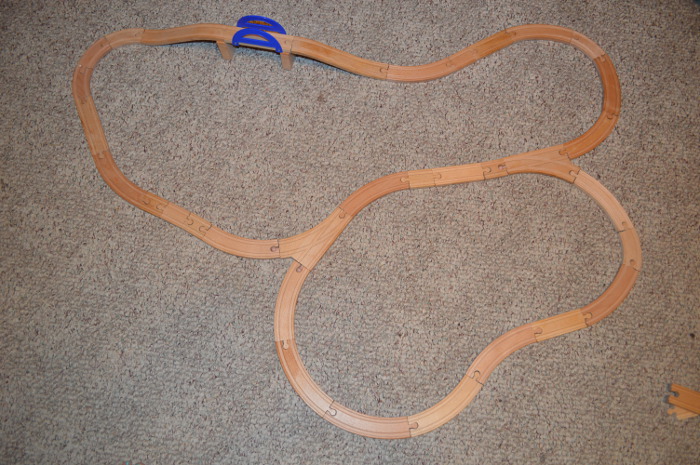
My daughter loves to play with trains. My husband really likes to be able to put the train tracks together so that she can play trains. (Or so he can secretly re-live his own childhood....) She's 3 and so this combination doesn't always go well. First of all, creating different tracks is great for expressing creativity, but right now Baby Girl is still learning how to make the tracks work. While picking up the train pieces one day, I mentioned that we should take a photo of it so that we can have an option to make it in the future if we're stumped for ideas, or if we just need to make a track really fast.

Then I thought, what if I printed off those pictures and laminated them on color paper.  Then I could make a little book of track ideas that Baby Girl could follow.

A few ways to go about laminating them;

1st: Cold Laminator
A woman who is close as family let me have hers that she wasn't using. The replacement paper isn't that much and it really comes in handy for different home projects.  If you can invest in one it's worth it.


2nd: Packaging Tape 
Before I owned a cold laminator, I wanted to laminate different newspaper clippings (my husband was in the paper a lot) but didn't have access nor the funds to laminate. I read somewhere about using packaging tape. It works really well, you just have to be careful and go slow. Tape one side and then flip over and repeat.

3rd: Photo Album 
Don't have either of these as an option? An old photo album works perfect, after all you can print the photos as photos and they will fit perfectly. Or you can print them black and white on your computer and cut them to fit.


Any of these options will work great!

Here are a few of our photos, along with the photo book I added them to for now. 


I decided to start mine in a photo album because it will be a little sturdier for my Baby Girl. Let's be honest, toddlers can be a little destructive. :) 


What are some ways you help your preschool toddler learn at home?  


You may also like: Preschool Part 1, Dress Up & Dolls


This post includes affiliate links, which means if you click on the link I get a portion of any sales at NO COST to you.  See my disclosure page for more details. 

Thursday, April 14, 2016

3 Ways to reuse that ice cream bucket

I love ice cream buckets! Even after the ice cream is all gone from them. They are functional for so many things. Here are a few of my favorite ways to reuse ice cream buckets.

1.Storage
Shoes, craft supplies, cleaning supplies, toys, etc. Check out my other post about toy organization using ice cream buckets, here.

Kid shoes are small, and so they don't take up a lot of space. I was able to get size 2, 3, 4, & 6 in their own bucket. Size 5 was during the winter months and the boots didn't fit as well. But this beat buying storage conatiners for all these shoes. Plus then I can keep the sizes separate which will come in handy.


2.Sand bucket
Why spend money on a bucket that's only purpose is to be filled up and dumped out? The ice cream bucket works well and even has a handle. 


3.Collecting
My daughter loves to collect things as we walk; leaves, rocks, sticks, pretty much anything that she can pick up off the ground.


How are ways you reuse containers in your house?  

Pinterest