Thursday, November 2, 2023

Use up the batter


Ok this one seems pretty simple, but really, think about it.  How many times do you use all the batter?  If you follow most muffin recipes, you end up with a little extra at the end.  Don't forget that spatula! It can scrap the batter to give you a whole extra muffin or cupcake! Sometimes I've even gotten two extra muffins!  

Too often we throw things out because it doesn't seem like there's much.  But, those small things add up.  Every time I make muffins, if I were to throw out the little bit that I could scrap  to make one more muffin, after 12 times of making muffins or cupcakes, I'd have another whole set of muffins!

Really, I know it doesn't seem like a lot, but those little things add up and thats where you start saving money.  

Enjoy today's little quick tip

Blessings 


Thursday, October 19, 2023

Travel Snack Prep


It's getting close to travel season and with traveling comes trying to keep the kids happy while you or your spouse is driving.  One way to help keep them happy is to keep them fed.  Let's be honest a fed kiddo is a happy kiddo.  

We went on a long trip this summer to see family in Indiana, for the most part my girls travel well, they've just always had to travel so that helps, but this was going to be a long trip.  So I prepared snack bags for the trip to and from (honestly, who wants to pack snack bags leaving your trip).  That was my best decision, it made packing to come home so much easier! So anyways, here is my how-to on prepping snacks for a long trip or any trip for that matter!

1. Make a schedule - 

Below are my schedules for there and home of our trip this summer.  These are the real scratch lists. They don't need to be pretty, just something that you can reference as you go.  Those longer trips can be harder to keep track of what everyone ate when, this really helped me.  Now, honestly did I follow this schedule like it was set in stone, did we not buy Cheetos at the gas station at one point, no.  Things changed, we had lots of rain, the schedule got bumped up a bit here and there, BUT, I was able to have a guideline to follow, I had a roadmap per say to help me. It was nice to have a reference of what we'd had or had available as we went.  


2. Make a list of snack options - 

I wanted to make sure that even though we were traveling, we were able to get some healthy snacks in along with some treats.  While treats are fun and exciting, it's those healthy snacks that keep everyone sane as well.  Snack ideas: cheese sticks, carrots, applesauce pouches, various cracker snacks, fruit strips, fruit snacks and raisins.

Repacking your own snacks is where you can save some money. Cheese sticks, raisins, and any of the cracker snacks are really easy to prepackage yourself instead of paying for them to be prepackaged.  

  • Cheese sticks: you can easily buy a large block of cheese and cut your own, throw in a cooler bag and voila your own cheese sticks for cheaper.  Check out my post here: Cheese Sticks for more details. 
  • Raisins: Yes it's fun to have your own individual box, but if you buy the large container you can pour your own individual baggies full.  You can also mix in some peanuts or cashews too if you are able. 
  • Cracker snacks: So first of all our youngest is gluten free, so she needs her own individual cracker snacks.  Also, if your house is anything like mine, no one likes the same snacks, so I just grab a few larger containers of the snacks we usually eat and divide up smaller baggies of them for each kiddo.  It beats spending more for the prepackaged + spending even more, because we all want different prepackaged snack bags. 

3Purchase the items needed 

Now that you know what all you want, it's easier to buy your snacks. It's really easy to go shopping and then get a bunch of items because you didn't plan ahead and end up with more than you need or items you weren't planning on.  Also, now that you know what snacks you are planning on saving with making your own, you can pick a few fun items too.  For example, yes it would be cheaper to buy applesauce and use my reusable pouches; however for the 12 hour drive it was not feasible to try and do, and honestly I didn't want to balance that.  So for this trip I saved on the cracker snacks and bought applesauce pouches.  We also bought fruit snacks and fruit strips as a fun treat. Things we don't have often, so it makes it fun.  You'll also note I had cereal listed as the first snack.  For this particular trip we took off early, so I let my girls pick ONE special box of cereal to share.  I then poured it into baggies for them.  Again a special treat, but we limited that one to one option and they only got the one bag full.  

4. Gather all your supplies, label and start packing 

Now, with all these different snacks I'm collecting, I do use our reusable baggies as much as possible.  I don't have any fancy ones we got ours from Walmart.  They work well, except the zipper sticks after I use them in the freezer, so if you are in the market for them make sure they are freezer safe.

Anyways, back to gathering your supplies.  I did use regular ziplock bags to hold all the snacks, because I wanted to write on them with Sharpie each kiddos name and either "THERE" or "HOME",  so I knew what bags were for when.  


Then I loaded each bag up.  I started with my schedule and figured out how many fruit strips I'd need for there, then put them in each kiddo's larger bag, then I did the same for the fruit snacks, applesauce pouches and raisins.  Then I took the cracker snacks and decided how many times we'd need a cracker snack and made up their individual bags of their cracker snacks choices and put those in their larger bag.  Then I repeated the process for the the trip home.  Again, seriously, this was my best decision, BECAUSE, I was having too much fun hanging out to want to pack like this while there the night before we came home.  And that worked out great, because it was already done.  

The cooler items, like the carrots, cheese sticks or other veggies I packed the morning of. I got them ready, carrots in one bag, cheese sticks in another, etc.  But, then packed them in the cooler in the morning.  

When I loaded our larger snack bag, I made sure the "HOME" bags were on the bottom and the "THERE" bags were on top. Then I didn't have to dig so much.  

5. Tips & Tricks I learned after 14 hours on the road: 

  1. Pack few extra snacks - you never know what might happen, pouring rain FOREVER or just extra hungry i.e. bored kiddos. I had a bag at the bottom that was leftover items we got; applesauce pouches, fruit snacks, fruit strips and we used a few of them. 
  2. Snack/hour - really even if you don't end up having a snack that often, if you are going for a longer trip plan snack/hour. 
  3. Have those fun snacks intermixed. Whatever is a fun snack for your household, us it's the fruit snacks and fruit strips.  I made sure to have those a few times for our long trip.
So if you are traveling for 5 hours or 20, I hope you find something here that you can use to help make that trip a little less costly, but still being able to have some good snacks along the way.   

Blessings on your upcoming travels 


Thursday, October 12, 2023

Weekly schedule after grocery shopping


So, I've shared a lot of things I do to save on groceries.  A lot are things that take some prep work when you get home and that can be a little daunting to get started. So I wanted to share my tips and tricks for how I go about it. 

There are 3-4 big things that I need to get done for prep when I get back from the grocery store.  If you've been following my blog these last few months you'll notice a few I've talked about.  They are as follows: 

1. Fruits & veggies following Amy Cross from A Cross legacy 

2. Dividing up the eggs 

3.  Making the cheese sticks

4. Dividing up the meat

When we are talking 2 weeks of fruits and veggies + 5-10 lbs of hamburger meat + 7-8 chicken breasts + 60 eggs + making your own cheese sticks, that can add up fast.  Let's be honest after a long shopping trip the last thing I want is extra work to put it all away.  So, I've started dividing up the chores.  

On the day I get home from the store: 

First, I divide up the eggs.  I have 4-5 18 egg cartons that I divide up the 60 eggs into.  That doesn't take that long and it's done. 

Second, I wash and prepare all my fruits and veggies.  You can check out Amy Cross' blog for her how-tos for the different fruits and veggies.  But, I usually can work on that as I unload a few groceries here and there.  

Then, I get the meat and cheese in the fridge as I bought it.  I don't worry about dividing it up right at that moment.  

Later that week: 

In the next few days, I take time to cut up the cheese into cheese sticks.  This isn't something that takes a lot of time, but to have to plan on cutting it up right after I get home can seem overwhelming, I mean I'm ready to sit for a bit, so I wait and do that within a day or two of the shopping trip.  Any more time and then I won't get it done either.  Make it a "chore" on your to-do list if you need to.  

Finally, I divide up the meat as I use it that week.  Usually, the hamburger meat and chicken are good in their packages for a few days.  The first night we have something with chicken, I divide the rest of it up as I'm cooking.  Same goes for the hamburger meat.  This also saves me from freezing it all and having to thaw something right after I bought it.  

And that's it! Rather than get everything done as I get home, it's nice to divide and conquer.  I hope it helps you if you are beginning to buy more in bulk or make your own items.  


What are some things you do that help you unload groceries? 

Friday, September 29, 2023

Breadcrumbs Re-visited


Way back I wrote about how I use breadcrumbs.  If you didn't see it you can check out that post here: Bread Crumbs. A pretty simple concept, but a process that can save you money over time.  If you've already started saving those bread crumbs from your toaster drawer, then this won't be a huge change as well. 

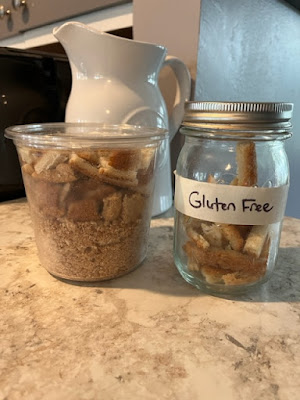
If you're like our house your kiddos don't eat their crust very often.  Most days, I will eat their crust, but there are days I just don't want to.  I started adding the crust pieces to my bread crumb jar.  I keep my bread crumb jar in the freezer so after a few days the crust pieces are easy to break down and crumble.  


This is just one more way you can get bread crumbs.  This has been really helpful with our family's recent shift in being more gluten free.  We don't all need to be gluten free, but my youngest has done better when she's not eating gluten.  With that, she also doesn't like the crust.  We now have a bread crumb jar and a GF bread crumb jar in our freezer.  Instead of having to buy GF bread crumbs, we were able to make our own without spending any extra money.  That is huge when GF food is just so much more pricey. 

Hope this helps you save a little 

Blessings, 


Thursday, September 21, 2023

Potato Soup with Sausage

    As I said in my previous soup post, it's soup season!  Being one who really likes soup, IF I had my way, we'd have soup 2-3 times a week during this time.  But, alas I have children and so we have soup twice a month at most. If you missed my last post on how to make your garden produce go farther by making soup you can check it out here: Soup.  Potato soup is my favorite soup.  I have different versions of potato soup that I make, but one way the whole family enjoys is adding sausage. 

We have made potato soup based on recipe I found years ago that added andouille sausage.  It's really good.  But, I wanted to make it cheaper.  So one day I bought a summer sausage.  Now, summer sausage is a little more, but I halved it and only added half the sausage in the potato soup and then froze the other half for another time.  You can do this with the andouille sausage as well, but there's just a little more sausage to the summer sausage roll so I found it works a little better.  Also, if you have a SAMS' CLUB or COSTCO membership, you usually can get them even cheaper in bulk. 

Another way, I've cut back on the expense of sausage in our potato soup is by using pork sausage.  Pork sausage is even less expensive than summer or andouille sausage.  If you can handle the more ground beef texture in your potato soup then this would work great. I accidentally stumbled upon this one time when I was cleaning out the fridge.  We had a little pork sausage and potato soup leftover, I decided to just combine them and see.  I actually really like it this way; however my family does not agree, so we stick to the summer sausage, but only use half the roll each time.  

Andouille sausage: $4.69/lb

Summer sausage: $4.74/lb

pork sausage: $2.32/lb 


Thursday, September 14, 2023

Soup


As we near Fall, we near soup season.  Although, I'm one that can eat soup all year long, but that's not the case with everyone else in my family.  So, I save soup for the Fall and Winter seasons.  I really enjoy making homemade soup and one thing that works great is to use up all those vegetables that you haven't used from your garden to make your soup.  Then you can store the soup in smaller containers and freeze for when you need them.  

This is great for those busy school nights, just pop a container or two out of the freezer and put in your fridge in the morning.  Then around supper, all you need to do is reheat it.  Quick, easy and you saved money by using produce from your garden.  

Garden Produce

Here are some garden produce that are great to add to soups:  

  • squash
  • peppers - ours had a woody taste this year,  (that's the best way to describe it) but cooked in a soup, you can't tell. 
  • tomatoes - all tomatoes work well in soup.  I accidentally planted multiple cherry tomatoes this year and we don't like tomatoes.  I usually use them to make sauce.  So I found myself with a lot of cherry tomatoes to use up.  I gave away a bunch and then added the rest to my soup. Also froze them before hand so I could wait to make my soup when I had the time. 
  • cabbage 
  • sweet potato 
  • carrots 

Those are just a few, there's so many more veggies from the grand that are great to use in soups! 

My favorite soups

Potato Soup  

This recipe is one that I start with, but have changed a few things.  Instead of bacon, I use sausage.  Instead of the green onions, I use our onions & peppers from the garden, you could keep the green onions too. 

Cabbage Soup

This one is a great recipe to use up that cabbage, it uses 1/2 a cabbage head!  It also uses up carrots &  potatoes.  Plus, you could cut the sausage in half you used for the potato soup and add the other half to this soup.  We tried this one this late summer and I froze it.  It froze and thawed well (I only had it from for about a month).  Also a great add in after you thaw it, make some white rice and toss it in.   

Autumn Squash & Sweet Potato Soup 

This soup uses squash, sweet potatoes and tomatoes. 


Thursday, September 7, 2023

Saving on fruit


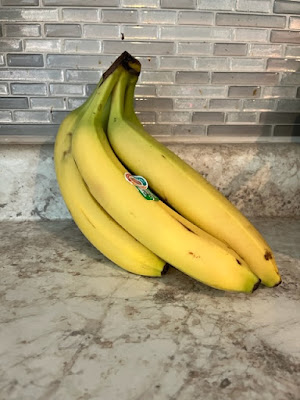
So you're in the store and you ask your kiddos, "what fruit do you want this week? Apples, bananas, grapes etc?"  They say bananas so you buy bananas and then later that week you see that the bananas are already turning. 

Happens to me so many times! And lately, I feel the bananas are turning faster.  Fresh produce just isn't as good as it was.  I think we're still catching up from COVID and things being shut down, the produce just takes longer to get here and while it's been waiting it's starting to ripen sooner.  But, that's my short opinion.  

Anyways, I've learned over the years that I could freeze them and keep them to make banana bread later.  That has worked well for us.  We like a good banana bread for breakfast in the fall and winter.  But, I wanted to help them last a little longer on the shelf or something. 

Thanks to The Cross Legacy I have! She has so many great ideas on helping keep your produce last longer. I've recommended her blog before, but I wanted to do so again.  This time of year we try not to go to the store as often, just because life gets busier with school and sometimes the weather isn't nice.  Currently our local grocery store is about 15min away in another town.  So, finding ways to help make less trips to the store has been very helpful.  

Amy Cross has many tips on how to keep lots of produce fresh longer than what you'd normally be able to keep it.  Check out her blog for more info!  


Thursday, August 31, 2023

School lunches


Let's talk school lunches.  While sometimes purchasing hot lunches are more convenient they can add up. We've done both hot and cold lunches over the years.  I am not against hot lunches, if you are able to do them go for it.  Or if you qualify for free/reduced lunch then that is more affordable.  However, if you are the in-between and are paying for hot lunches at full price, but want to try and save a little this post is for you. 

     This post includes affiliate links, which means if you click on the link I get a portion of any sales at NO COST to you.  See my disclosure page for more details. 

Recently, we've tried to budget our lunches more and therefore have limited our girls' hot lunches.  So of course, that means that I needed to start thinking about cold lunch ideas.  With subbing, I wanted ones that are quick and easy to make, preferably the night before and with one kiddo gluten free, I needed to make sure that was considered as well.  

Now, I will say, as I stated in the beginning, getting hot lunch is a convenience you pay for, so the times I am subbing long term, we may let there be more hot lunch options.  But otherwise, we will do cold as much as possible. Here are a list of some of our favorite cold meal options that do save money. 

There are a lot of different options when it comes to fruit and veggies.  I do try and use the fruits and veggies that are in season because they are more affordable. 


Fruits: apple slices, applesauce, grapes or mandarin oranges 

Veggies: carrots, celery, frozen peas, green beans (from the garden) or cucumbers 

*Also, for the cheese sticks we don't buy prepackaged cheese sticks, but instead we buy a large block of cheese and cut it up into smaller cheese sticks.  You can check out that post her: Homemade Cheese Sticks. 

  1. boiled eggs  + cheese stick* + veggie + fruit 
  2. tuna salad on crackers + veggie + fruit 
  3. peanut butter cracker sandwiches+ cheese stick* + fruit + veggie 
  4. peanut butter on celery + cheese stick* + fruit 
  5. peanut butter + jelly sandwich + veggies + cheese stick 
How do I know these are not as expensive as a hot lunch.  Well let's break it down. Bare with me we are going to do some math.  Our current school lunches are around $2.50 so let's see what each cold lunch I've planned adds up to.  Now, I will say prices can vary, especially with the fruits and veggies, but if you shop the sales + what's in season that makes a big difference. The following are Walmart prices because that's what we have close at the moment.  Another way to save, would be if you have a Sams Club or Costco nearby, because some of the things you can get in bulk and then it's cheaper. 

Option 1: boiled eggs + cheese stick + veggie & fruit 
    1. eggs = $7.47/60 eggs = .12cents/egg 
    2. cheese stick = $7.32/32oz = .25cents/cheese stick 
    3. carrots $1.24/1lb bag = .25cents/serving 
    4. applesauce $3.52/48oz = .32cents/serving 


SO, if you were to take the first lunch meal your total would be .94 cents.  IF you were to double your egg and cheese stick, it would still only be $1.31. This is also with regular prices of carrots and applesauce, just think if you were to stock up on applesauce when it was on sale. With that, we don't buy the individual applesauce cups/pouches.  Those cost more.  We buy the big applesauce container and pour out in a small cup for the lunch boxes.  You can do this ahead of time the night before, or if you have enough containers and fridge space, you can make ahead what you would need for the week.  Then it's just grab and go in the morning.  Here are some more prices for the rest.  I would encourage you to mix and match your options, but add up the individual prices to make sure.  

  1. crackers = $3.88/120 = .03cents/cracker = .26cents/4 sandwiches or .32cents/5 sandwiches 
  2. tuna salad = $3.52/4 pack = .44cents/serving (1 day's lunch) 
  3. peanut butter = $5.92/40oz = .17cents/serving (1 day's lunch) 
  4. bread = $1.78/20 slices = .09cents/slice = .18 cents/sandwich 
  5. jelly = $2.92/17oz = .12cents/serving 
  6. apple slices = $5.28/3lbs = .66cents/apple = .33cents/serving 
  7. grapes = $3.78/bag = .38cents/serving 
  8. mandarin oranges 
  9. celery = $1.34/stalk (about 8 slices/stalk) = .17cents/slice (2 slices for each serving) 
  10. frozen peas $2.28/2lb bag = .21cents/serving 
  11. cucumbers $1.97/bag = .28cents/serving 
  12. green beans + free from garden 

Using the more expensive fruit and veggie option here are what the totals could be:  

Option 2: tuna on crackers + veggie & fruit 
    
    tuna crackers .76 cents/5 sandwiches + apple slices .33cents + cucumbers .28cents = $1.37 
    tuna crackers .76 cents/5 sandwiches + grapes .38cents + cucumbers .28cents = $1.42 

Option 3: peanut butter on crackers +cheese stick + veggie and fruit 

    peanut butter sandwiches .49cents/5 sandwiches + cheese stick .25cents + grapes .38cents + cucumbers .28cents = $1.40 

Option 4: peanut butter on celery + cheese stick & fruit 

    peanut butter on celery .52cents + cheese stick .25cents + applesauce .32cents = $1.09 

Option 5: peanut butter and jelly sandwich + veggies & cheese stick 

    peanut butter sandwich .47cents + cucumbers .28cents + cheese stick .25cents = $1.00 

Now let's talk drinks.  If you can find a water bottle that will fit in your child's lunch box, that is the best and most affordable option.  However, if you can't there are options for drinks that still will keep your lunch more affordable.  

1. Orange juice packs $4.46/6pk = .74cents/bottle 
2. Apple juice packs $3.96/6pk = .66cents/bottle 
3. Milk at school .35cents 

So one last adding. Again I'm taking the most expensive of each item so there will be times that it will be less.  I also wouldn't plan orange juice for each one, but would rather make sure water or milk were their first options, with the orange juice and apple juice here and there.  But, I wanted to show you how even with the more expensive drinks, the whole lunch is still cheaper.  Some buy 15 cents others more.  

Option 1: boiled egg(2) + cheese stick + veggie + fruit + orange juice = $1.80 
Option 2: tuna on crackers(5 sandwiches) + grapes + cucumbers + orange juice = $2.16
Option 3: peanut butter on crackers + cheese stick + grapes + cucumbers + orange juice = $2.14 
Option 4: peanut butter on celery + cheese stick + applesauce + orange juice = $1.83
Option 5: peanut butter sandwich + cucumbers + cheese stick + orange juice = $1.74 

With that, if you wanted to toss in a homemade cookie here and there, you'd be able to and still stay in budget.  

That was a lot, I hope it gives you some help if you are trying to save some money this school year.  It's definitely something that takes a lot of time to organize, but if you get most of the items ready ahead of time, it won't take long afterwards.  For example with the cheese sticks, we've made them so much now I'm in a rhythm of cutting up the block within the first day or two of buying it from the store.  Then I freeze most of them and have them ready when needed. Pick a couple things to start and do a couple cold lunches if you can, then add more in as you're able. 

Also, don't forget, even if you do hot lunch here and there, the times you are making cold lunches saves you and that adds up over time.  

One more thing before I finish.  Anything you can do ahead of time to help the morning be more efficient the better.  As I said with the apple sauce, if you can make them ahead for the week, then you or your kiddo can just grab one and go. Check out the amazon link below with great options.  

You can also do this with the cheese sticks, throw in what you'll need for the week in the fridge and then they can grab in the morning.  Make a menu for the cold lunches for the week so everyone knows what they are having.  The veggies, fruit, eggs and cheese sticks can all be ready to go for the week.  A little bit more time in prepping saves those busy mornings. 

Don't forget to check out the links below: 
1. The first link are the cups we have and I really like them. We had bought the lunch box containers that they came with and so  they fit in our lunch box well. 
2. The 2nd option I haven't tried yet, but when I was looking at buying more containers this one stood out. I like how they are stackable.  I also like how I could get three different colors, so each of my girls could have a color and know what one to grab in the morning. AND, I could use them for fruit, veggies, the boiled egg and maybe even the crackers with pb.  
3. This option would be nice to pair with one of the other two above options.  Then you have a space for the large meal (sandwich, crackers, etc) and two smaller containers for the veggies, cheese stick or eggs. 


Thursday, August 24, 2023

10 things you can make homemade


Homemade.  Making things homemade is not only more affordable; in most cases, but it also it usually a lot more earth-friendly too.  In the last 5-8 years I've become more and more earth conscious.  I personally feel God gave us this planet and as He states in Genesis; "we are to be stewards of the earth", and therefore, I'm am doing my best to do just that.  So with that, here are 10 things you can make homemade, save money and help out our planet as well.  

     This post includes affiliate links, which means if you click on the link I get a portion of any sales at NO COST to you.  See my disclosure page for more details. 

BATHROOM

1. Hand Soap 

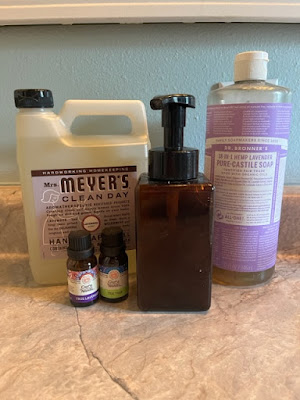
I recently shared on my IG account my homemade hand soap recipe.  Making homemade hand soap is so easy.  Plus you can make it to fit your needs/wants.  For example, in the winter I usually add little extra aloe vera juice to help with the extra dryness. Also, I like to switch out my essential oil smells with the season as well. 

I would also invest in a good foam hand pump.  It makes this recipe work well + last a long time.   

My basic recipe: 

  • 1/4 cup Dr. Bronner's soap
  • 1 Tbsp Olive Oil 
  • 1 Tbsp Aloe Vera Juice 
  • Fill the rest with water 
  • optional 2-4 drops of essential oils. (I like lavender for Spring and Summer and orange or Rose Geranium for Fall/Winter. ***Make sure if you are making this soap for kids you use caution with what oils to use, I like the books "Just the Essentials" and ""Naturally Bug Free" as references for appropriate eo ages. 

2. Shampoo 

I have two posts on homemade Shampoo: 

  • Save on Shampoo has a recipe that use Dr. Bronner's soap, essential oils and a few other ingredients. 
  • Homemade Shampoo has a how to recipe using very basic ingredients; baking soda and water. 

3. Bath Soak 

LAUNDRY

4. Laundry Soap 

KITCHEN

5. Brown Sugar 

6. Hot Chocolate 

7. Pizza/Pizza Crust 

8. Homemade Breads

9. Baby Food

10. Chicken Broth 

11. Burritos

FOR FUN

12. Bubbles 

13. Ornaments: 

Up-cycle Ornaments 

Homemade Ornaments 


Thursday, August 17, 2023

Teacher Gifts (Back to School edition)


 School is almost here, what a great time to show those teachers we are so blessed to have them in our kiddos lives.  Gifts don't have to be elaborate or cost a lot, actually most schools don't want gifts for teachers due to maybe leading to favoritism and such.  So with that homemade gifts are really best.  

Here are a few ideas for some homemade beginning of the school year teacher gifts. 

1. Potted plant 

If you've started to have more plants, then you know they often have babies that you need to find homes for.  What better home than in a classroom.  


2. Homemade canned goods 

If you have a garden and can your own produce this is a great homemade gift. Pickles are a favorite of ours to give. Or give a small basket of some of your freshly picked tomatoes, beans, squash etc. 


3. Name plates  

There are so many fun craft ideas out there for your teacher's  name.  I recently, saw one of scrabble letters glued to a scrabble plate that spelled the teacher's name. 

4. Supplies 

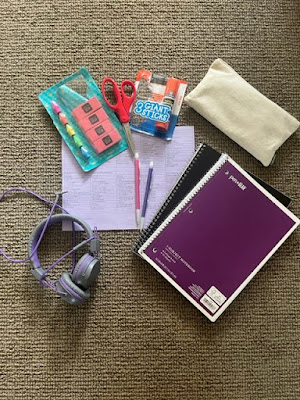
How often do teacher's donate their own money to extra supplies for their classroom.  If you followed my last post on ways to save on school supplies (you can check it out here) then you already have some extra supplies on hand.  Make a small package that includes: a folder, a notebook, glue bottle and a box of crayons to give to your child's teacher.  This gift can be a double gift; helping out a student who many not be able to get supplies and the teacher who already supplies a lot of the materials in the classroom.  


5. Flowers

This is one I've mentioned before for Teacher Appreciation week, you can can view that post here with more ideas. But back to flowers, using the flowers from your new flower garden, you can pick a free bouquet to give to your child's teacher. 


These are just a few ideas to get you started.  What are some ways you show your child's teacher you are happy to have them as their teacher this year? 

Thursday, August 10, 2023

Homemade Shampoo: Baking Soda & Water


I know a few weeks ago I shared about making your own shampoo, but I wanted to share this simple recipe that a friend shared with me.  This is an easy and affordable way to wash your hair.

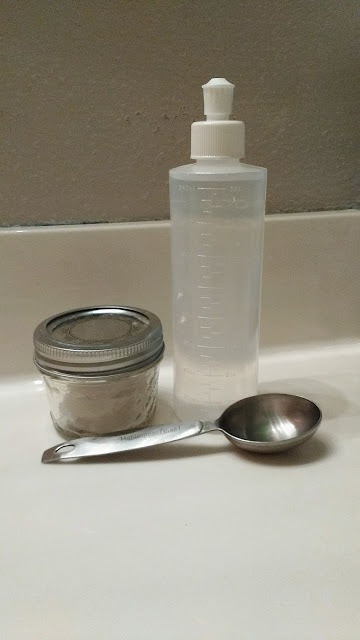
What you will need: 
Baking soda (1 TBsp)
8oz bottle for water

The easiest way is to start with the Tbsp of baking soda in your bottle and bring it in the shower with you.  Then, fill the bottle in the shower and shake well.  You'll want to add it to your hair as soon as you mix it.
Use whole bottle each time to wash your hair.  Make sure to apply to wet hair, let it set a minute or two and then rinse.  Helps with dandruff too!

Another tip use Apple Cider Vinegar for conditioning:
Dip ends of hair into the Apple cider vinegar and then just rinse off.

It's that easy.  And imagine how more cost friendly this is as opposed to buying shampoo and conditioner.  Plus for all of you out there who are like me and are trying to stay healthy, green and chemical free, but don't want to break the bank, what better way than to use basics such as baking soda and apple cider vinegar?

If you liked this post, then you may also like

Household Items (Ways to use baking soda and vinegar in the home)

Save on Shampoo (More options on homemade shampoo) 

Thursday, August 3, 2023

Great Reads


I've shared a few books over the years and I wanted to make a spot for all of them.  I'm sure I'll add to them, but for now here is a great list of books to help you not only save money, but also do better for the planet as well.  

This post includes affiliate links, which means if you click on the link I get a portion of any sales at NO COST to you.  See my disclosure page for more details. 


1. Naturally Bug Free

This book has many recipes for ways to deter or kill bugs, rodents from your home, pets, self and more. She breaks down the recipes along with the supplies you will need.  She also does a great job of giving you guidelines for what essential oils to use based on age or pets.  At the end of her book she has a great list of resources for where she purchases and more! If you are looking to try and swap your chemically based bug/rodent deterrents this is a great start! I liked this book so much and was trying to use so many recipes I ended up buying my own copy.  I would recommend buying this one instead of just checking it out, but in my opinion always check it out first then buy if you are finding you are using it a lot. 

 2. Just the Essentials 

This is another book that I would recommend owning, just because there are so many different recipes to use and try.  In this book Adrina helps break down essential oils, their potencies and how to use them.  I really like how she helps guide what oils are save for kids and what ones are not.  She has a great collection of homemade recipes for things as simple as perfume all the way up to homemade toothpaste ad deodorant.  If you are looking for ways to switch a lot of your household and beauty/self care products to more natural and homemade, this is a great book option! 

3. Vegetables Love Flowers 

I recently shared this one in my post: Grow Your Own Flower Garden Thanks to this book, I was able to successfully plants flowers in my garden, harvest them for inside enjoyment and help my vegetables grow by having flowers for the pollinators in my garden.  A great resource to have for beginning flower gardening that you want to make work for your garden and inside.  She shows how to cut, when to cut, what to plant and more.  Buy your own copy or check out your local library! 


Thursday, July 27, 2023

Back to School!


It's back to school time! Time to get all those school supplies ready!  Ok, I have always enjoyed back to school shopping; all through my school years, and as a teacher and even still today.  But, there are many ways to save during school supply shopping time.  Here are just a few ways we save each school year. 

1. Check what we have first 

Every year we go through our box of school supplies that we had from the year before. Yes, we have a box, and after this post you are going to want to start a box too! It's really simple, find a small box and a space where you can keep it.  This will be used for all the extra school supplies I'll talk about later.  So, anyways we check the box to see what we already have that we don't need to buy more of.  For example, erasers, pencils, glue sticks.  

2. Make a list for each kiddo of what they need from their school list (after you've checked off what you already have) 

This is key! Either mark off on their actual list what you already have OR make a new list.  Otherwise when you get to the store, theY are going to want said item you already have or you are going to forget and buy more than you need of something that won't last, you know the fun folders or something like that. Believe me, I've been there! 

3. Buy extra 

Ok, now's the time to buy extra.  Think about the whole year, our teachers always put an extra folder on the list and I add at least one more.  I know one of my kiddos, she is hard on her school supplies.  These weeks when they are on sale is the time to buy them, otherwise mid year I'm going to need to replace a folder at full price! What!? No thank you.  So buy extra, whatever they don't take to school goes in the supply box, when they need more you go there first. At the end of the year whatever you didn't use, save for the next year.  Prices usually go up a bit each year, as we've seen these last couple of years, and guess what buying extra the year before saved you having to pay that increase!! It does add up! 

Some things we buy extra of: 

  • notebooks
  • folders 
  • glue bottles
  • glue sticks 
  • erasers (I buy the big pack and split it up, then buy another pack for extra)
  • pencils   
  • pens 
  • lined paper 
So as you are preparing to get those school supplies.  Remember to think ahead: 
1. Retake stock of what you have
2. Make a List 
3. Stock-up! 

Happy school shopping! 

Thursday, July 20, 2023

Landscaping ideas


 Looking for ways to improve your landscaping, but don't want to spend a lot?  Recently, I wanted to update our front landscaping, plus I wanted to have flowers available for our pollinators.  I've really been working hard to try and include more flowers in our yard and garden.  There's such a need for those pollinators that I want to make sure they have a place.  So much that I made space in my garden this year for flowers.  It works two-fold, it's great for them + they help your veggies and fruits grow! If you're interested in more of that you can check out my post "Grow your own flower garden"

But, anyways I was looking for ways to add more flowers and make our front yard look better.  I have two big pots that sit on my porch, that were a lime green color.  I knew I wanted to spray paint them yellow, I liked the yellow against our blue house. 

Before
After


 So after talking this over with a family member, she mentioned getting more pots and placing them around the house with flowers in them.  I thought this was genius.  A great way to add some color.  Plus I knew I could save by doing a couple things;  

1. Shop end of season sales 

    Plants ~ I recently bought the plants in the new picture for 25 cents/piece.  They were originally over $2 a piece.  Now, they won't come back each year because they are annual, but for $1.25 I still have the rest of the Summer and the Fall to enjoy them.  

    Pots ~ Now that I know what I want to add to our yard, I can buy pots at the end of the season as well.  Those big plastic pots aren't that expensive to start with, but when you need a lot it adds up.  Plus, why not wait until you can get 2 or 3 for the price of 1 originally. 

2. Spray-paint pots 

Then, once you've got your pots you can spray paint them to all match! Especially since you are waiting to buy them at the end of the season, you might not get all the same color.  But, that's ok, because you can buy a couple cans of spray paint and paint them to match. Spray paint isn't that much and they make it now with primer + paint in one. 

Now, I know spray paint is not the best for the environment.  I use to spray paint all the time; however, as I've become more environmentally friendly, I only use it here and there.  For example I made one can work for my two pots.  I could get more and go over it better, but I decided that was enough to make the difference I wanted and I wasn't using two cans.  So with that, this is totally an option you can take out.  It would just take you longer to maybe find matching pots or you cold go for the eclectic look of mismatch pots.  

I am hoping to find a bunch of white pots to put around our house for the flowers.  I'll keep you posted. 


Thursday, July 13, 2023

Homemade Scavenger Hunts

    Summer is the time for traveling.  And traveling with kids can be an interesting combination.  A while ago I posted about our busy folders that we use for church and traveling.  If you missed it you can check here: Busy Folders . Recently I added a homemade BINGO/scavenger hunt to our busy folders and wanted to share.  

Have you tried BINGOS/scavenger hunts while you travel yet?  They are so fun and they really work great for all ages.  It's a fun new twist on the old games we used to play, you know before DVDs in the car. 

You can search Pinterest for travel scavenger hunt ideas or even download printable ones, or you can make your own.  

Some of our favorite themes and ideas include: 

Fall ~ colorful trees, leaves

Easter ~ flowers, crosses, Easter eggs, bunnies 

Christmas ~ Christmas lights, Christmas trees, manger, snow,  Santa 

Summer ~ flowers, trees

Special places ~ We travel to a couple different cities often and there are certain things our girls want to see.   I include these on the scavenger hunt list as well.  They make for easy spots to mark to keep it going and not drag on. For example, when I was little and we traveled to Missouri and my sister and I always watched out for the green bridges. So if you have a normal route you can think of places to add, this makes it more personable. 

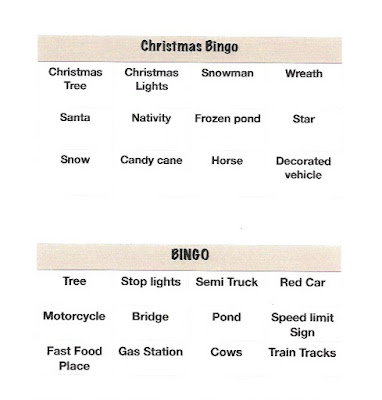
Items you could include on all or a basic list: red car, motorcycle, semi, street lights, highway sign, speed limit sign etc.  I have included our Christmas and general one for you to use.  Just click on the image and right click to save then print. 

Tips and Tricks: 

Pictures for younger kids vs. words 

Markers to cross off the items 

Going further: 

If you want them to be reused; print on cardstock and laminate or use dry erase pockets.  Then use dry erase markers & a reusable towel. This is great for themed scavenger hunts like; Christmas, Thanksgiving, Easter etc. 


Thursday, July 6, 2023

10 things you can swap to reusable and save money


 There are so many ways now to save money and help out the planet.  Recently, I've been trying to less my carbon footprint a little more each month. I wanted to share with you 10 changes I've made that are not only helping our planet, but also helping my budget too! 


     This post includes affiliate links, which means if you click on the link I get a portion of any sales at NO COST to you.  See my disclosure page for more details. 


1. Reusable cotton swabs/q tips ~  

Have you heard of Last Object? They have many ways to change your one use objects into reusable objects.  Plus, it does save you money.  Check out my post Last Object Post on cotton swabs vs their last round to see. And make sure to check out their other items too; last swab, last tissue and more! 


2. Silicone bags ~ 

While, I've been one to wash out my plastic bags to reuse them over and over again, I do really like these new silicone baggies.  You can find them almost anywhere now.  They work great for traveling, freezing & storing. They hold up great and are an easy clean out.  You can spend as little as $5.00 for a couple which makes them pretty affordable. 


3. Silicone muffin cup liners ~

Oh my word, these are probably my favorite new item I've gotten this year! They work great, easy clean-up and you can get them in all kinds of fun colors! Check out my recent post I did about them here: Silicone ~ Mats & Cupcake liners


4. Silicone mats ~

Probably 2nd to the silicone cupcake liners for me.  I use these all the time for baking! Makes cleaning the pans a breeze!


5. Cloth napkins ~

Seriously, cloth napkins are really something to get on board with.  You can buy them already made or you can buy a pack of flour sack towels and cut them to your desired sizes.  But really, throw them in with your towels when you need to wash and that's it! If you are concerned about stains get white ones and you can lightly bleach them when needed.  


6. Rain barrel/water from dehumidifier ~

   If you have a garden, watering it can add up.  Invest in a good rain barrel and let nature help take the toil off the water bill.  For indoor plants you can use your dehumidifier; rather than dump that water down the drain, use it for your houseplants.  Don't use the dehumidifier on your garden because you aren't supposed to ingest that water and the plants that you will later eat, will absorb the water. So Rain Barrel = garden & dehumidifier = houseplants. 


7. Reusable paper towels ~

Have you hopped on the reusable paper towel train yet?  I've tried a few different "paper towel" like items.  I like the Norwex counter cloths for kitchen spills.  I bought Swedish dish cloths for everything else.  They hold up well.  I use them a lot in the kitchen for small things, but I don't like them for spills, I feel it takes them a long time to absorb.  I use them for my fruits and vegetables to soak up extra condensation in their containers OR after I wash them.  

8. Reusable swiffer rags ~

Did you know you can make your own re-usable stiffer rags? You can also buy them if you want, just search reusable swiffer rags on amazon.  I haven't purchased any, but use ones I was gifted that were made. They work just as well and I'm not throwing them away after each use. 

9. Misto/Evo oil sprayer ~

So while I've been trying to throw less away, I was talking with someone about how I wish they made a sprayer you could reuse with your own oil.  Then one day when I was checking out a recipe the author mentioned using the Misto Oil Sprayer.  It is awesome! All you do is pour your oil of choice inside, pump 10-12 times and spray.   I've used it over and over and I'm no longer throwing away the spray canisters.  Plus, I can buy my oil on sale or in bulk and save rather than pay for convenience. 

FOR WOMEN ONLY 

10. Reusable pads/menstrual cups ~ 

If you want to stop throwing away those single use tampons check out my post on Female Products

If you are wanting to stop throwing away pads, check out this Etsy shop: ARYAcreations.  I recently bought some reusable pads from her and really like them.  You can also make your own, there are many patterns out there, but if you aren't a great sewer this a great place to purchase them.  


Pinterest