Thursday, August 25, 2022

Fun School Calendar

 I am all about organization and things looking cute. While I wouldn't call myself fashionable by any means, I do like my organization to be cute and somewhat stylish.  

Last fall my husband built me the most amazing mudroom locker system.  Yes, I'm bragging, I was so excited to have it in and am so proud of him for making it. I'll share the process in an upcoming post. But here's a sneak peak at them for now: 


So, since my mudroom is now cute, I wanted to have my girls' school calendars presented in a stylish way as well.  One thing that was nice about this locker system is that they each have a cubby for school items.  With this I didn't need to have all their different schedules posted on the wall.  BUT, last year I realized we needed those important daily items in sight.  Things like Library day, PE day for shoes and now PE clothes. This year I printed out a daily reminder of the week for those important items marked with who they are for and framed the list. That simple! 


Adding a frame to almost anything makes it more stylish and cute in my opinion.  Plus, the frame can be decorated to your style.  You could easily do this for each kiddo's schedule if you wanted to.  What I like about this idea is you can gear it to what works for you.  I prefer to have a quick check list we can look at as we are getting ready to leave.  But, maybe you are one who needs the whole schedule.  You could easily use a frame for each child's schedule!
Some other variations: 
1. Add a dry erase marker and your kiddo could check off what they have ready to go.  It just wipes clean off the glass for each new day. 
2. Use pictures for the younger kiddos who are still learning to read. 

Check out this post by A Beautiful Mess for an easy how-to frame for swapping pictures. That way you could swap schedules or important notes from the school if needed. This is on my list to make one for those important papers. 

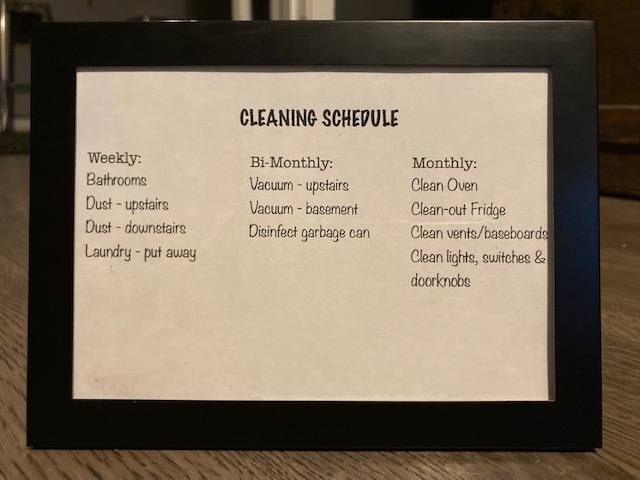
Here are some other schedules I have made and framed this week. While I can't say I will be diligently following these schedules, they help give me a baseline for each week/month. 


Laundry Schedule 


Cleaning Schedule 


Are you one to make schedules? What are some things you like to have a schedule for? 


Wednesday, August 10, 2022

Homemade Brown Sugar


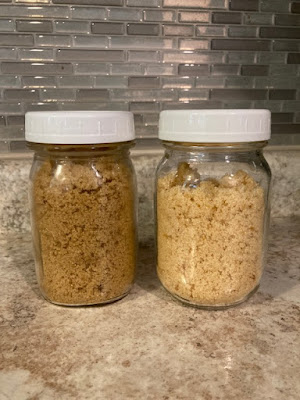
Dark: molasses, Light: sorghum


This post includes affiliate links, which means if you click on the link I get a portion of any sales at NO COST to you.  See my disclosure page for more details. 

Making homemade brown sugar helps in many ways.  One, it's just helpful to know.  There have been many times I've gone to get brown sugar and realized I didn't have any.  Being able to make my own in the spur of the moment has been so helpful. 

Two, you can gear it toward your family's taste buds. If you look up homemade brown sugar you're going to find the same ratio on almost any blog. 1 TBSP molasses to 1 cup of sugar. Pretty basic. But, you may find that doesn't match the store bought as well. At least, my family did. We use brown sugar when we eat oatmeal.  I put a little in and mix it and then I sprinkle a little on top just for fun.  Well, one of my girls noticed that the homemade brown sugar did not taste the same. However; I just learned how to make brown sugar homemade and I don't want to have to buy it anymore, plus if I make it homemade it's one less plastic bag item I'm purchasing. So I did some experimenting.

I use 1 1/4 cup of sugar to 1 TBSP of molasses.  Molasses does have a strong flavor and that extra 1/4 cup just helped take the edge off.  Plus, you make a little more which means your molasses bottle stretches a little further.

Now, while I was experimenting, I found out that some people use sorghum in place of molasses. While, sorghum is similar; here's what I found on google: molasses is made from sugar cane, sorghum is made from the sorghum plant.  They crush the sorghum stalks, then heat them, steam off the excess water and the sorghum syrup is what's left. Because of this, sorghum is sweeter than molasses. So I did some experimenting with sorghum instead of molasses to make brown sugar. 

Prior to inflation, sorghum was actually cheaper than molasses, making it a better use for homemade brown sugar. However; recently it's prices have increased quite a bit, I 'll break down both options later and you can decide which works for your family best.  Also, if prices ever go back to normal you have this guideline to help you determine which is cheaper.  

With sorghum being sweeter I did only used 1 cup of sugar to 1 TBSP of sorghum.  I found that the brown sugar I made from sorghum was lighter than the molasses brown sugar.  It would depend on if you prefer dark or light brown sugar, but if you prefer dark then you'd need to double the sorghum, keeping the sugar the same.

My how-to: 

1. Add the sugar (I always started with 1 cup before I strayed from the normal ratio)


2. Add the molasses or sorghum (1 TBSP or 2 if using sorghum and want it darker)


3. Mix on level 2 until the consistency is to your preference. I did have to stop it and scrap the bowl a bit and stir a little longer. 


4. Store in a mason glass jar. If you use 1 1/4 cup of sugar you can fit it in a pint size jar. If you double it you will need to use a quart sized jar.  


Now let's break down the prices shall we.  Using the recipe above for the molasses; 1 1/4 cup sugar to 1 TBSP molasses, and keeping everything measured by cups and TBSPs here's what I gathered: 

***Prices will vary depending on where you go and where you are located.***

Molasses:

1 bag of brown sugar costs between $1.70 - $2.29/32oz

    Using the $2.29 cost, this equals about .70cents per recipe or 1 1/4 cup of brown sugar. 

Molasses: $3.48 - $4.49/12oz = This will yield about 24 Tbsps or 24 recipes of brown sugar.  That's .19cents per 1 1/4 cup recipe. 

Sugar: $2.83/4lb = This will yield about 9 cups of sugar or 7 recipes of brown sugar. That's .31cents per cup of sugar + .08cents per 1/4 cup. 

    Using the $4.49 cost of molasses + the $2.83 cost for sugar, this equals about .58cents per recipe or 1 1/4 cup homemade brown sugar.  

As you can see you are saving around .12cents per recipe using molasses. 

Sorghum:

Remember for sorghum I only used 1 cup of sugar to 1/2 TBSPs of sorghum 

Sorghum: $16.99/16oz = This will yield 32 TBSP or 32 recipes of light brown sugar/16 recipes of darker brown sugar. 

Light brown Sugar: One recipe cost would be .84cents 

    Using your .31cents per 1 cup sugar + .53cents per TBSP of sorghum 

Dark brown Sugar: One recipe cost would be $1.37 

    Using your .31cents per 1 cup sugar + $1.06 per TBSP of sorghum 

As you can see right now, you would be paying around .14-.36cents more per recipe using sorghum vs. buying brown sugar. 

So depending on taste will determine if you'd rather use molasses or sorghum.  Luckily, my kiddos prefer the molasses to the sorghum as it's cheaper to make currently.  While sorghum has a sweeter flavor, personally I also feel the molasses tastes the most like the brown sugar in the store.  However, I will be watching those prices of sorghum to see if they go back down below molasses and we will just make another switch if they do! 

Remember it's the small savings that add up.  Plus, you are saving the planet by not buying another item in plastic. Molasses and sorghum both come in a glass jar and sugar in a paper bag.  No more need to buy the plastic wrapped brown sugar.  Save money and the planet!! 

I hope this helps you! 


Monday, July 25, 2022

Preschool Name


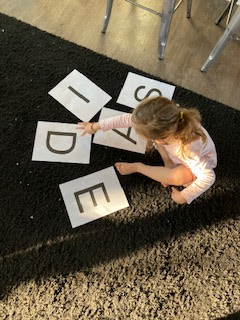
Preschool post! It's been awhile since I've posted about preschool, but I wanted to share our recent preschool activity.  This past year, I worked with my youngest on spelling her name.  We printed each letter from her name on it's own piece of paper. An easy way practice how to spell her name.  Don't have access to a printer, write each letter on a piece of paper with a sharpie or pen.


Then we mix up the papers and I would say the letters in her name and she would point to that letter.  After a bit, then she would put her name in order herself.  This is also something you could do to help with letter recognition.  As your child starts to recognize the letters in their own name, you could start spelling other names or words to help with learning their letters.  

Another way you cold use this is matching uppercase to lower case letters.  With this, I would just write each letter out instead of print each letter to save on ink.  You could even make them front and back to save on paper as well. Such as letters A-M on one side and N-Z on the other. 

To keep the papers from getting ripped or torn, you could put them in the sheet protectors. 

Depending on how far you want to take this activity, you have many options, but for a simple way help your kiddo learn their name it doesn't take much. 


Saturday, June 4, 2022

Easy, Affordable Father's Day gift ideas


Father's Day is just around the corner.  In our house we strive for homemade or adorable gifts. We have a busy May; 4 birthdays, an anniversary and of course Mother's Day.  So come June we try to make Father's Day fun, but simple as well. I wanted to share some of our favorite Father's Day gift ideas. 


Coupons: 


These are our favorite! My girls enjoy coming up with different things to gift their dad in a coupon.  I enjoy their creativity and it's so personal. Here are some we've made:

1. Free hour of alone time (or 3! )  

2. 1 free ice cream cone 

3. Free bottle of pop 

4. One free day of golf 

5. Help with yard work 


Treat/Gift with a fun pun:


1. Popcorn ~ You're the best Pop around (could also work for their favorite soda) 

2. Favorite Candy ~ We think you're the sweetest! 

3. Donut ~ Donut you know you're the best? 

4. Golf balls ~ You're the best dad, by par! 

5.Book ~ You're always up for an adventure 


Homemade: 

The less perfect, the more special


1. Popsicle photo frame with photo of kids and dad inside 

  • Need: four popsicle sticks, picture to use 
  • Glue four possible sticks together 
  • Attach picture to the back using tape
2. Handprints on paper framed 

  • Paint hand or trace their hand on card-stock and cut out. 
  • Frame 
3. Handprint card: Why buy a card when you can make one?
  • Cut cardstock to desired size (I cut mine in half)
  • Fold 1/2 sheet in half 
  • Paint or trace child's hand 
  • Add Happy Father's Day 
  • Let the kids be creative on the inside and there you go! 


Hope that this gives you some ideas to help make your Father's Day more fun! 

Pinterest