Wednesday, November 24, 2021

Homemade & Upcycled ornaments


It's that time of year again! Homemade ornament making season!  This year, as I was contemplating what I wanted to make I decided I wanted to not only spend as little as possible, but also maybe use up some of my craft scrap items.  Ok, so I really didn't know what to call my craft scrap items, so let me explain what those are.  If you've been following my blog you know that not only do I try to spend little on a project, but I also like to up-cycle materials I can't recycle.  With that, my craft scrap items are things that I don't want to throw away to make more trash, but I can't recycle them so they get stored in my craft room to maybe serve a new purpose in the future.  

While I was looking through my craft scrap items, I found a bag full of lids.  Lids from spaghetti jars, jelly jars, pickle jars and more.  Yes, I saved the lids.  I can't get myself to throw them away and I can't recycle them, so I store them in a ziplock bag.  And guess what?! They were the perfect item for my ornament idea!  

This year, my husband and I started Civil War Re-Enactment.  It was something my husband did when he was in middle school and we thought it would be fun to do as a family.  When I was thinking about ornament ideas, my husband mentioned making something that tied into re-enactment. (Each year the girls' ornaments represent something from the year).  Knowing I wanted to do something with a photo of them from Re-Enactment and finding the lids, my idea started forming! 

Ok so that brings me to our project! Did you know you can make cute photo holders out of old lids?  Let me show you how! 

Materials: 

lids from jars (your choice on size)

circle cutter OR sharpie & scissors 

twine or ribbon of choice 

4x6 photo of choice 

hot glue gun & glue sticks 

1st: Cut out your photo based on the size of your jar lid.  

I used lids from spaghetti sauce.  The lids measured about 2 1/2 inches in diameter.  I first used my circle cutter to cut out the photo.  However, after my 2nd photo my blade didn't work, so I just ended up tracing the rest with a sharpie and cutting them out with scissors.  This works just as well, so if you don't have a circle cutter you can still make it work.  Place your lid on the photo you want to use covering the part you want to show case, then trace with a sharpie.  Note that the inside is a little smaller than the outside of the lid, so just cut along the inner part of the sharpie line.  


2nd: Pop the photo in! 

NO GLUING NEEDED! The photo will just pop right in and stay in since there's a rim around the edge of the jar!  Plus, if you ever want to swap out photos you can! 

3rd: Add the twine or ribbon to the back of the lid.

Hot glue the twine or ribbon to the back of the first lid. 


4th: Glue the two lids together. 

Take the 2nd lid (If you want to make it double sided) add hot glue to the edge and press the two lids together. Now you don't have to have the photo ornament be double sided, but you can cover up the hot glue spot if you do.  Plus as it spins you can see two different photos! 

All in all, once I had the photos printed this took me maybe 30 minutes and that was for all three! It's a really fast project!  You can make these photo holders as gifts for Christmas, or a special occasion too! I hope you enjoy!  


You can check out last year's ornament craft here


Tuesday, May 18, 2021

Last Object


I love when I can combine saving money with saving the environment.  Recently, I was introduced to a product called Last Object.  


The following are my own opinions and I have not been paid for any certain opinion. 


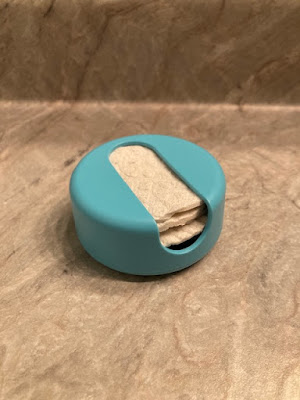
Last object has different items that normally serve a one time use, but they made them into something that you can reuse.  Now, I haven't bought all of their products, but I bought the last round and I am really liking it.  I use it each morning and night to hydrate my face with toner.  Then once I'm done I just rinse it off and store it in its container for a later use.  The Last Rounds come with 6 rounds in each container.  So, I have about 3 days worth before I am reusing the first round all over again.  

One thing I found for me was my round wasn't drying out completely before I went to use it again.  One, it might be because I use it again in 3 days as opposed to 6.  Or, it could be it just wasn't able to dry out well where I kept it.  So I started just leaving the one I recently used on top of the container until my next use and then place it at the bottom as it had dried.  


I have really enjoyed using this as opposed to throwing away a cotton or 2 twice a day.  Which brings me to some of the benefits of using Last Rounds.  

First, I was using two cotton balls each morning and each night.  I used the basic large cotton balls.  But with LastRound, I've found I just need to use one of their reusable rounds each time.  

A second benefit to LastRounds is the price.  I know it seems like when you are wanting to buy something that lasts longer it cost a lot more than the time is worth.  Well, that's not the case for LastRound.  LastObject guarantees a life expectancy for their LastRounds of about 1,700 uses.  Let me break down that for you.  I mentioned I used 2 cotton balls each time twice a day.  That was 4 cotton balls a day, 28 a week and about 1,400 a year!  One LastRound will last the equivalent of a little over a year's supply of cotton balls!  That is a lot of cotton balls!!  The price of Walmart's basic large cotton ball bag is $1.88 for 200. I would end up buying 8 bags over the course of a year which would be around $15.00 without tax.  LastRound's cost $14.00.  And that's just the first year, remember I would have anther 300 uses after that left and maybe more!   

A third and final benefit I wanted to talk about is their impact on the environment.  Remember I said I like when I can combine saving money with helping out the planet. Well, by using LastObject products, I can help to save water from the production of all those cotton balls that I was throwing away after just one use.  Or even if I was composting them...it seems like a lot of work for a quick use.  Plus, LastObject's products are compostable, so after you've used them up for a year or so, you can compost them knowing that you used them to their max instead of just once. 

Again, I've been really impressed with this product and their company in general.  I plan to buy another pack of cotton rounds to put in my nail polish bag.  That way when my girls and I do our nails we can use the LastRounds instead of cotton balls.  Plus, then I have a set that's devoted just to nail polish.  Eventually my girls will each have their own packs for their faces as they get older.  And because LastObject kits come in different colors, we each can have our own color coded set.  


Tuesday, February 9, 2021

Melted crayons


This post includes affiliate links, which means if you click on the link I get a portion of any sales at NO COST to you.  See my disclosure page for more details. 

Have broken crayons lying around?  They are perfect to use to remake crayon molds.  At Christmas time we made some trees and stars for family.  Crayon molds are a great gift that kids can help make and they can work for almost any holiday!  


So here's the simple way to make your crayon molds. 

First what you need: 

broken crayons 

silicone molds (shapes of your choice) 

cookie sheet 

oven 

How to make them: 

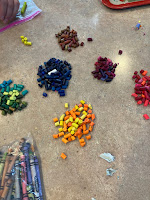
First: Peel any crayons that need peeled.  Sometimes you need a small knife to slice down the peel. 


Second: Break up your broken crayons enough that they can fit in the mold.  Depending on your molds some of the crayons will need to be broken up even more.   You can use a knife to cut them if needed.  


  Third: Place the crayon pieces into the molds. Make sure to fill the molds pretty well, as they fill less space when liquefied. 


  Fourth: Place the silicone mold on a cookie sheet, bake @ 215 degrees for about 20 min.


Fifth: Take out of the oven and let cool on counter on cookie sheet for a couple minutes.  Then keeping the crayon mold on a cookie sheet place in the fridge for 
about 5-10 min. 

Sixth: Place just the crayon mold in the freezer for about 5 min. 


Seventh: Pop the new crayon molds out of the mold.


And there you have it!  A fun and easy gift for Valentine's!!   


Tuesday, January 26, 2021

Burritos

 Homemade burritos 


**Best little burrito helper out there**

Homemade burritos are a great way to get a quick healthy lunch in during a busy work day.  I like them for days that I sub, they are a quick grab to put in my lunchbag.  They are perfect to take out of the freezer and microwave real fast.

What you will need: 

  • tacos shells ( I like to use whole wheat) 

For the filling there are lots of options.  The below recipe is what I recently used. 

Filling ingredients: 

  • refried beans
  • sweet potatoes 
  • peppers
  • black beans 

Other options to add: scrambled eggs, yogurt, meat 


First: Cut the veggies


Second: Cook the sweet potatoes, make sure they are tender 


Third: Add any other vegetables to cook together: 


Fourth:  Add the refried beans or any other filling you are using. 


Making the burritos

First: Lay out your saran wrap or wax paper.  

This mix will make about 10 tacos.  If you have room lay out a few shells at a time.  We used our bar and so made about 6 at a time.  

Second: Add a small amount of the filling to the middle of your taco shell. 


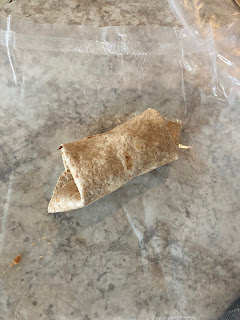
Third: Fold up the burrito.  

Fold in both sides, then fold the the bottom up and roll the burrito.


And there you have it!  Then wrap each burrito in Saran Wrap or wax paper and place in a ziplock bag and into your freezer.  Then you have at least 10 burritos in the freezer ready to grab when you need them. 


Pinterest