Showing posts with label organic. Show all posts

Thursday, August 24, 2023

10 things you can make homemade


Homemade.  Making things homemade is not only more affordable; in most cases, but it also it usually a lot more earth-friendly too.  In the last 5-8 years I've become more and more earth conscious.  I personally feel God gave us this planet and as He states in Genesis; "we are to be stewards of the earth", and therefore, I'm am doing my best to do just that.  So with that, here are 10 things you can make homemade, save money and help out our planet as well.  

     This post includes affiliate links, which means if you click on the link I get a portion of any sales at NO COST to you.  See my disclosure page for more details. 

BATHROOM

1. Hand Soap 

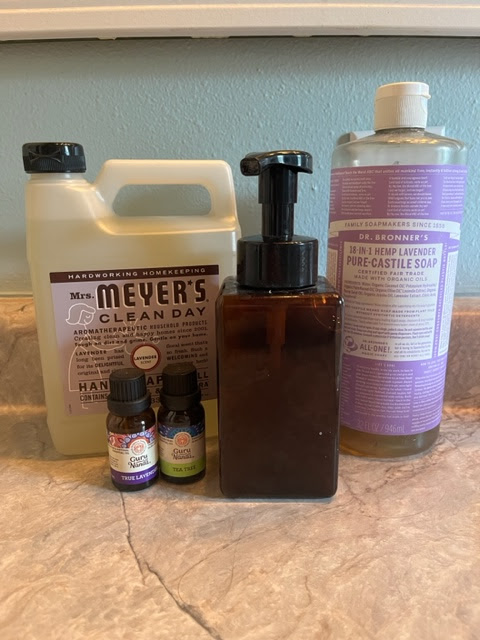
I recently shared on my IG account my homemade hand soap recipe.  Making homemade hand soap is so easy.  Plus you can make it to fit your needs/wants.  For example, in the winter I usually add little extra aloe vera juice to help with the extra dryness. Also, I like to switch out my essential oil smells with the season as well. 

I would also invest in a good foam hand pump.  It makes this recipe work well + last a long time.   

My basic recipe: 

  • 1/4 cup Dr. Bronner's soap
  • 1 Tbsp Olive Oil 
  • 1 Tbsp Aloe Vera Juice 
  • Fill the rest with water 
  • optional 2-4 drops of essential oils. (I like lavender for Spring and Summer and orange or Rose Geranium for Fall/Winter. ***Make sure if you are making this soap for kids you use caution with what oils to use, I like the books "Just the Essentials" and ""Naturally Bug Free" as references for appropriate eo ages. 

2. Shampoo 

I have two posts on homemade Shampoo: 

  • Save on Shampoo has a recipe that use Dr. Bronner's soap, essential oils and a few other ingredients. 
  • Homemade Shampoo has a how to recipe using very basic ingredients; baking soda and water. 

3. Bath Soak 

LAUNDRY

4. Laundry Soap 

KITCHEN

5. Brown Sugar 

6. Hot Chocolate 

7. Pizza/Pizza Crust 

8. Homemade Breads

9. Baby Food

10. Chicken Broth 

11. Burritos

FOR FUN

12. Bubbles 

13. Ornaments: 

Up-cycle Ornaments 

Homemade Ornaments 


Thursday, August 10, 2023

Homemade Shampoo: Baking Soda & Water


I know a few weeks ago I shared about making your own shampoo, but I wanted to share this simple recipe that a friend shared with me.  This is an easy and affordable way to wash your hair.

What you will need: 
Baking soda (1 TBsp)
8oz bottle for water

The easiest way is to start with the Tbsp of baking soda in your bottle and bring it in the shower with you.  Then, fill the bottle in the shower and shake well.  You'll want to add it to your hair as soon as you mix it.
Use whole bottle each time to wash your hair.  Make sure to apply to wet hair, let it set a minute or two and then rinse.  Helps with dandruff too!

Another tip use Apple Cider Vinegar for conditioning:
Dip ends of hair into the Apple cider vinegar and then just rinse off.

It's that easy.  And imagine how more cost friendly this is as opposed to buying shampoo and conditioner.  Plus for all of you out there who are like me and are trying to stay healthy, green and chemical free, but don't want to break the bank, what better way than to use basics such as baking soda and apple cider vinegar?

If you liked this post, then you may also like

Household Items (Ways to use baking soda and vinegar in the home)

Save on Shampoo (More options on homemade shampoo) 

Thursday, July 6, 2023

10 things you can swap to reusable and save money


 There are so many ways now to save money and help out the planet.  Recently, I've been trying to less my carbon footprint a little more each month. I wanted to share with you 10 changes I've made that are not only helping our planet, but also helping my budget too! 


     This post includes affiliate links, which means if you click on the link I get a portion of any sales at NO COST to you.  See my disclosure page for more details. 


1. Reusable cotton swabs/q tips ~  

Have you heard of Last Object? They have many ways to change your one use objects into reusable objects.  Plus, it does save you money.  Check out my post Last Object Post on cotton swabs vs their last round to see. And make sure to check out their other items too; last swab, last tissue and more! 


2. Silicone bags ~ 

While, I've been one to wash out my plastic bags to reuse them over and over again, I do really like these new silicone baggies.  You can find them almost anywhere now.  They work great for traveling, freezing & storing. They hold up great and are an easy clean out.  You can spend as little as $5.00 for a couple which makes them pretty affordable. 


3. Silicone muffin cup liners ~

Oh my word, these are probably my favorite new item I've gotten this year! They work great, easy clean-up and you can get them in all kinds of fun colors! Check out my recent post I did about them here: Silicone ~ Mats & Cupcake liners


4. Silicone mats ~

Probably 2nd to the silicone cupcake liners for me.  I use these all the time for baking! Makes cleaning the pans a breeze!


5. Cloth napkins ~

Seriously, cloth napkins are really something to get on board with.  You can buy them already made or you can buy a pack of flour sack towels and cut them to your desired sizes.  But really, throw them in with your towels when you need to wash and that's it! If you are concerned about stains get white ones and you can lightly bleach them when needed.  


6. Rain barrel/water from dehumidifier ~

   If you have a garden, watering it can add up.  Invest in a good rain barrel and let nature help take the toil off the water bill.  For indoor plants you can use your dehumidifier; rather than dump that water down the drain, use it for your houseplants.  Don't use the dehumidifier on your garden because you aren't supposed to ingest that water and the plants that you will later eat, will absorb the water. So Rain Barrel = garden & dehumidifier = houseplants. 


7. Reusable paper towels ~

Have you hopped on the reusable paper towel train yet?  I've tried a few different "paper towel" like items.  I like the Norwex counter cloths for kitchen spills.  I bought Swedish dish cloths for everything else.  They hold up well.  I use them a lot in the kitchen for small things, but I don't like them for spills, I feel it takes them a long time to absorb.  I use them for my fruits and vegetables to soak up extra condensation in their containers OR after I wash them.  

8. Reusable swiffer rags ~

Did you know you can make your own re-usable stiffer rags? You can also buy them if you want, just search reusable swiffer rags on amazon.  I haven't purchased any, but use ones I was gifted that were made. They work just as well and I'm not throwing them away after each use. 

9. Misto/Evo oil sprayer ~

So while I've been trying to throw less away, I was talking with someone about how I wish they made a sprayer you could reuse with your own oil.  Then one day when I was checking out a recipe the author mentioned using the Misto Oil Sprayer.  It is awesome! All you do is pour your oil of choice inside, pump 10-12 times and spray.   I've used it over and over and I'm no longer throwing away the spray canisters.  Plus, I can buy my oil on sale or in bulk and save rather than pay for convenience. 

FOR WOMEN ONLY 

10. Reusable pads/menstrual cups ~ 

If you want to stop throwing away those single use tampons check out my post on Female Products. 

If you are wanting to stop throwing away pads, check out this Etsy shop: ARYAcreations.  I recently bought some reusable pads from her and really like them.  You can also make your own, there are many patterns out there, but if you aren't a great sewer this a great place to purchase them.  


Thursday, May 11, 2023

Homemade Compost


So I've been working on composting the last few years.  When I first started composting, I used a small ceramic compost container that I got from World Market.  When it was full or about 1/week, I'd run it out to my garden and put it in the posts.  However, I wanted to have a bigger compost so that I could do throw even less away. 

A couple years ago I found this sweet galvanized trash can at Walmart on sale...only $11.00!  It was perfect, I was so excited! 


Then my husband drilled some holes all around the sides. 


It was so simple to make!  We added a couple cinder blocks for it to sit on in our backyard.  That's it! 

Now, I am able to dump my under the sink compost right out my back door into this larger compost, along with clippings from our yard and I can make my own compost! 


Last Fall was the first time I added the compost from this bin to my garden.  We recently planted some vegetables and the soil was so soft and easy to till.  I did give my larger compost in the can two years before I used it on my garden.  BUT, it is large enough that I didn't have to empty it in-between and was able to add all our food scraps throughout the year. 


So if you are looking to make your own compost, grab an old trashcan, plastic works too, and get started.  It really is easy to do!  Just make sure to layer brown items too; egg cartons, toilet paper rolls, leaves, that will help it to not be too wet.  


Thursday, April 13, 2023

Newspaper Trashbags


A couple weeks ago I posted some life hacks.  One of the life hacks I talked about was making trash bags out of newspapers, from the blog Improvised Life.  If you missed it you can check it out here.  I wanted to take it a step further and try what Improvised Life does, only make it for my larger trash can in my girls' bathroom.   

These trash can liners are easy to make and are a great way to help out the environment. Instead of buying more plastic, you are reusing what you have.  So I figured if I can make it work for a small can, why not try a larger one?  

In order to do this, you will need 4 sheets of newspaper instead of just the 1 sheet. After that the process is merely the same, you just need to connect the 4 pieces.  

This post includes affiliate links, which means if you click on the link I get a portion of any sales at NO COST to you.  See my disclosure page for more details. 


Step 1: 

First take 2 sheets and staple the edges together.  To do this you need to first fold about an inch on each edge, then you can staple the edges together.  Staples break down, which is why I chose to use them.  Make sure to staple close together so you don't have gaps in your bag later. 


Step 2: 

Second, take the other two pieces of newspaper and do the same. 

Step 3:

Then, you will do the same with your two larger pieces of newspaper and connect them together. This can get a bit tricky as the edges have staples, so just watch as you fold. 


Step 4: 


Flip it all over.  Before you start the fold, you want to have the folded staple parts on the bottom.  


Step 5:

Start the folding process.  It is the same process as the smaller folding process.  It really does fold better than you think even though it's so much bigger.  Don't worry about making the lines crease tightly.  You can watch the video from Improvised Life here or you can follow along below with a step-by-step tutorial: 

Step 1: Place newspaper at a diagonal, then fold in half. 
Step 2: Fold the newspaper in half 
Step 3: Take the right corner and fold it over to the left side.  Make sure the bottom has a flat edge. 
Step 4: Flip over the newspaper and repeat step 3, just fold over the other left side to the right side. 
Step 5: Then take the flap and fold it into the pocket. 
Step 6: Flip over and repeat on the other side. 

One extra step for the larger newspaper bag that I've learned is to staple the sides together.  Where the corner kind of sticks out a bit, on the larger bag it's a lot more and so I just staple it to the side.  


That's it! Remember you can check out the youtube video posted on the Improvised Life post for a visual.


So far, I've been happy with this as a trash bag in my girls' bathroom.  But, if you want to help the environment by switching from plastic and don't want to make a newspaper trash bag, check out the Amazon link at the bottom for another option.  I use these green bags for  my kitchen trash.  I'll be honest, I tried the larger newspaper bags for the kitchen trashcan and let me just say, they don't work well for large amounts of mess.  But, I really like these green bags for the kitchen, they work great!  If you can buy them in bulk, it makes the cost a lot less and closer to the plastic you already get! Plus, you can split the bigger bulk size with a friend & it helps the cost! 


I hope you were inspired to find a way to be a little more environmental.

~ Blessings 


Thursday, April 6, 2023

Indoor Garden Savings


    Starting your summer garden indoors can add up fast. But, did you know there are many ways to start it without having to buy a lot of extra supplies? There are so many items around your house or as you go out and about that you can use to start your indoor garden, without having to buy specific items.  

Let's talk the containers.  Instead of buying the seedling pod packs, there are so many things you can use instead: 

1.  Coffee Cups: 

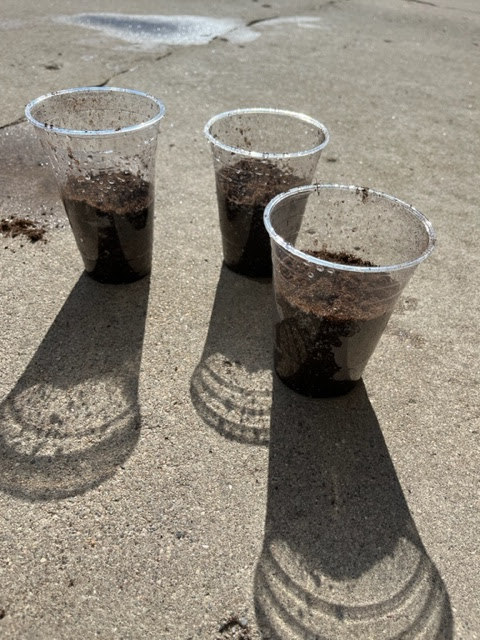
Start by saving those coffee cups.  You can use either plastic or the paper.  The paper will break-down so you can plant it right in the ground, the plastic ones you'd need to replant the plant in the ground.  


2. Egg cartons

Egg cartons make the perfect seed starter.  They also are able to break-down so all you have to do is just replant them into the ground.  One tip for these is, I would mist the cartons when you are ready to plant them in your garden, that way they tear apart easily. Also, depending on what you start in the egg cartons and how soon you start them; you may need to replant them into something bigger before you plant in your garden.  But, with the egg carton you can just place in larger container as it will break down.  


3. Milk jugs: 

Last year I used a couple milk jugs for lettuce.  I ended up starting them inside too soon, but it worked out as I had a big enough container for the lettuce to mature inside! 

4. Coffee Canisters: 

Coffee canisters make great pots for plants, but you can also use them for seed starting as well.  The plants would need to be re-potted when you place in your garden.  

5. Toilet paper rolls 

Did you know you can use toilet paper or paper towel rolls to start seeds?  Check out this post by Pam's Greenhouses for more of a how-to! 


Finally, make sure to keep those seeds moist, a great way to do this is to place a container over them to help keep the moisture in.  Any of those plastic oven bake covers you get with the tin foil baskets work great! Or anything else in your recycling! 


There you have it! Rather than buying containers for your seeds you have a few ways to try and save instead.  Good luck! Please share your photos too! 

Have a great week! 

Inisha 

Thursday, March 2, 2023

Homemade plant pots


It's getting time to start repotting those houseplants! Plant pots can add up and while I enjoy my houseplants, I don't want to spend a ton to have them either. I have two different ways that I save on my plant pots.  

First, did you know you can use almost anything as a planter?  Being a newbie to plants in the last few years, I've started to find some unique ways to save on pots.

Here are my 3 favorite homemade planters: 

1. Tin cans 

What I like about tin cans, is they are pretty stylish already.  Really all you need to do is drill some holes in the bottom for drainage and you're set! And drilling holes is not that hard, all you need is a nail and a hammer, it's pretty simple to do. 

2. Coffee cans 

Whether you buy the tin coffee canisters or the plastic, they both work great to use for planters.  The tin canisters look great on their own, just like the tin cans.  The plastic ones you may choose to paint.  

3. Ice cream buckets 

These work great for those big hanging plants.  One they need more room, two they will drape over the sides and cover the bucket themselves. But, if you still want you can paint the bucket as well. 

Some more options for homemade planters include the following; 

  • tea cups 
  • plastic to go coffee cups ~ these work great for starting plants too! 
Second, reusing the pots you already have for other plants in your house: 

I am always thinking which plant can go to which pot next.  Rotating my plants is a great way to save on buying pots.  This takes a little bit more thought, but it does help to not over buy pots when needed.  

1. I grab all the plants that need repotting. 


2. Then starting with the largest, I repot it into the newest largest pot.  
3. From there, I take the next largest plant to put in the empty pot.  Then I just continue down to the smallest. 


Sometimes it pays to have a few spare pots around the house.  I had a lot this time around that needed split up and so needed extra potters.  Luckily I had a couple in my basement.  Plus, I ended up with a few babies I was able to give away!  


With this system, instead of repotting every time a plant grows, I am able to wait and use the pots that I have.  Unless your plant is really busting through, usually you can have it wait a bit to be repotted.  

I hope this helps! 


Thursday, February 9, 2023

Snow for watering plants


    Did you know you can use snow to water your plants? Now, don't go out and grab some snow and put in your plant pot, because then your plant is not going to be happy.  But, if you use melted snow to water your plants you are not only saving on water, but you are benefitting your plant as well! 

As snow falls through the atmosphere, nitrogen attaches to the snowflakes.  This is turn becomes nitric oxide and is really good for plants because it's essentially a natural fertilizer. So if you are looking for a great way to add some nutrients to your indoor plants and save money in watering, use snow! Can I just say, how amazing God is that He created all nature to work together.  It is just little things like this that make me go, WOW! He really has it all worked out, even to the smallest details! 

Back to watering with snow: 

Watering your plants with snow is pretty easy. 

1. Find a container you want to use to hold the snow/melted water. 

2. Collect snow from outside. 

3. Keep container inside and the snow will slowly melt. 


    You will notice that you will have less water than you did snow, because snow takes up more room that the liquid it is made of.  This gives you room to add more snow as it melts. I like to keep adding snow until my container is full of water so I know I have plenty.  Plus the snow won't last forever, right?

4. Once the snow is all melted and the water is room temperature, you can use it to water your plants just as you would with your normal water. 

It's that easy! 


Tuesday, May 18, 2021

Last Object


I love when I can combine saving money with saving the environment.  Recently, I was introduced to a product called Last Object.  


The following are my own opinions and I have not been paid for any certain opinion. 


Last object has different items that normally serve a one time use, but they made them into something that you can reuse.  Now, I haven't bought all of their products, but I bought the last round and I am really liking it.  I use it each morning and night to hydrate my face with toner.  Then once I'm done I just rinse it off and store it in its container for a later use.  The Last Rounds come with 6 rounds in each container.  So, I have about 3 days worth before I am reusing the first round all over again.  

One thing I found for me was my round wasn't drying out completely before I went to use it again.  One, it might be because I use it again in 3 days as opposed to 6.  Or, it could be it just wasn't able to dry out well where I kept it.  So I started just leaving the one I recently used on top of the container until my next use and then place it at the bottom as it had dried.  


I have really enjoyed using this as opposed to throwing away a cotton or 2 twice a day.  Which brings me to some of the benefits of using Last Rounds.  

First, I was using two cotton balls each morning and each night.  I used the basic large cotton balls.  But with LastRound, I've found I just need to use one of their reusable rounds each time.  

A second benefit to LastRounds is the price.  I know it seems like when you are wanting to buy something that lasts longer it cost a lot more than the time is worth.  Well, that's not the case for LastRound.  LastObject guarantees a life expectancy for their LastRounds of about 1,700 uses.  Let me break down that for you.  I mentioned I used 2 cotton balls each time twice a day.  That was 4 cotton balls a day, 28 a week and about 1,400 a year!  One LastRound will last the equivalent of a little over a year's supply of cotton balls!  That is a lot of cotton balls!!  The price of Walmart's basic large cotton ball bag is $1.88 for 200. I would end up buying 8 bags over the course of a year which would be around $15.00 without tax.  LastRound's cost $14.00.  And that's just the first year, remember I would have anther 300 uses after that left and maybe more!   

A third and final benefit I wanted to talk about is their impact on the environment.  Remember I said I like when I can combine saving money with helping out the planet. Well, by using LastObject products, I can help to save water from the production of all those cotton balls that I was throwing away after just one use.  Or even if I was composting them...it seems like a lot of work for a quick use.  Plus, LastObject's products are compostable, so after you've used them up for a year or so, you can compost them knowing that you used them to their max instead of just once. 

Again, I've been really impressed with this product and their company in general.  I plan to buy another pack of cotton rounds to put in my nail polish bag.  That way when my girls and I do our nails we can use the LastRounds instead of cotton balls.  Plus, then I have a set that's devoted just to nail polish.  Eventually my girls will each have their own packs for their faces as they get older.  And because LastObject kits come in different colors, we each can have our own color coded set.  


Tuesday, June 12, 2018

Baby Food: the third time around


We've hit that stage again with Little S, she is now eating baby food!  I feel it makes them so much more happy, because they feel like everyone else sitting in a chair ( well high chair) and eating food (well, what was real food, until mashed).  But really, they just seem to feel like they are apart of the whole experience at the table.

In the weeks leading up to us starting baby food, little S would reach out for anything and everything she could to try and put in her mouth.  And if she was in her saucer instead of on my lap at the table with us, she'd be fussy.  She just wanted to be apart of what we were doing and she was starting to recognize that she was not.  

So we started her on baby food.  Now I will say we haven't done well with making out own this time around.  Our Spring was crazy busy and I feel I'm now slowing down, I know right as we enter SUMMER, but I didn't get around to making my own baby food this time around.  However, I can't say that's a bad thing, because I only knew how to make 3 different types of baby food, peas, carrots and applesauce.  

But recently I was reading this post; on a blog called Think Baby, written by a few moms and they have all kinds of different recipes for baby food!  I love that this one has pumpkin and even avocado!   But before you look at the recipes, check out their post on The Baby Brezza.  To all of you new moms out there if you can you should invest (or add to your registry) this baby food maker.  My other two girls, I made their baby food in a blender which was more time consuming, but this thing...well you'll have to check out the post to see for yourself.

So now I've got some great summer plans, making new types of baby food!  Oh Little miss S is in for a treat!  She's pretty excited herself! 

Do you have any favorite baby recipe blends? I'd love to hear some more ideas! 

Pinterest